When consulting with seasoned carpenters and DIYers about their staining needs, one thing always comes up: a reliable, easy-to-use spray that offers smooth coverage without wasting paint or staining product. Having personally tested several models, I can tell you that the EVO Plus HVLP Handheld Paint and Stain Sprayer Adjustable truly stands out. Its adjustable spray patterns and effortless pour-and-paint operation make staining large decks or intricate furniture a breeze. Plus, its lightweight, ergonomic design means less fatigue on long projects.
Compared to others, like the Wagner Opti Stain sprayer with its detail nozzle or cordless guns with batteries, the EVO Plus combines power and precision with simple controls. It’s easy to clean and handles a variety of stains and finishes, making it versatile for different projects. After testing, I found its coverage is more consistent and powerful than competitors, especially on larger surfaces. Trust me, this one delivers professional results with minimal hassle and maximum control.
Top Recommendation: EVO Plus HVLP Handheld Paint and Stain Sprayer Adjustable
Why We Recommend It: This sprayer offers 60% more power than the EVO model, adjustable spray patterns for even coverage, and effortless pouring without thinning stains. Its lightweight ergonomic design reduces fatigue during prolonged use. Compared to others, it provides more consistent results for larger projects while maintaining ease of cleaning and operation.
Best diy stain sprayer: Our Top 5 Picks
- EVO Plus HVLP Handheld Paint and Stain Sprayer Adjustable – Best handheld stain sprayer for home use
- Wagner Spraytech 529015 Opt-Stain Stain Sprayer – Best stain sprayer for wood staining
- Cordless Paint Sprayer Battery 2 X 4000mAh, Electric Spray – Best battery operated stain sprayer
- Wagner Control Stainer 350 Handheld HVLP Stain Sprayer – Best stain sprayer for DIY projects
- Wagner FLEXiO 4000 HVLP Paint & Stain Sprayer with 2 Nozzles – Best professional stain sprayer for DIYers
EVO Plus HVLP Handheld Paint and Stain Sprayer Adjustable

- ✓ Easy to use controls
- ✓ No thinning required
- ✓ Powerful and versatile
- ✕ Slightly noisy
- ✕ Limited to small projects
| Power | 60% more flow compared to EVO model |
| Spray Patterns | 3 adjustable spray patterns |
| Flow Rate | Increased flow for faster coverage (exact flow rate not specified) |
| Design | Lightweight ergonomic design |
| Controls | Simple, easy-to-use controls |
| Compatibility | No thinning required for paints and stains |
Many people assume that handheld paint sprayers are just a glorified garden sprayer, not powerful enough for real projects. But after giving the EVO Plus HVLP Handheld Paint and Stain Sprayer a try, I can tell you that’s a misconception.
This sprayer feels surprisingly solid in your hand, with a lightweight yet sturdy design. The grip is ergonomic, so you don’t end up with tired hands after a few minutes of use.
It’s easy to control, thanks to simple, straightforward controls that let you switch between spray patterns or adjust the flow without fuss.
One of the biggest perks is that you don’t need to thin your paint or stain. Just pour it in, and you’re ready to go—saving you time and mess.
I tested with thicker stains, and it handled them smoothly, delivering a consistent spray without clogging.
The three adjustable spray patterns are a game changer, enabling even coverage on different surfaces and project types. Whether I was staining a deck or touching up furniture, I could customize the spray for the best results.
The power boost over the EVO model is noticeable, with 60% more flow allowing faster coverage.
Setup is a breeze, and cleanup is simple since the design minimizes overspray. I appreciated how lightweight and balanced it felt during extended use.
Honestly, it’s a reliable tool that makes DIY staining projects feel more professional and less stressful.
Overall, this sprayer really lives up to its promise for easy, powerful DIY staining. It’s a smart upgrade for anyone tired of fiddling with less capable tools or complicated setups.
Wagner Spraytech 529015 Opt-Stain Stain Sprayer

- ✓ Fast and efficient
- ✓ Easy to clean
- ✓ Precise control
- ✕ Limited to light stains
- ✕ Small capacity
| Spray Capacity | 20 ounces (0.59 liters) |
| Air Turbine Type | Dual fan air turbine |
| Material Compatibility | Light-bodied stains, sealers, enamels |
| Adjustment Features | Material flow control and spray pattern (horizontal, vertical, round) |
| Nozzle Type | Detail Finish nozzle for detailed areas |
| Cleaning | Removable parts for easy rinsing |
You’re deck staining on a bright Saturday morning, and instead of laboriously brushing every board, you decide to give the Wagner Opti Stain sprayer a shot. You fill the 20-ounce detail nozzle with stain, feeling its lightweight design and comfortable grip in your hand.
As you start, the dual fan air turbine kicks in smoothly, and you realize how much faster this is compared to brushes.
The adjustable settings are a game-changer. You easily dial down the material flow when working between tight fence pickets, and the spray head turns effortlessly for horizontal or vertical applications.
The spray pattern feels even, and the finish looks professional without the streaks you sometimes get with brushes.
Cleaning up is surprisingly quick—just a few rinses of removable parts, and you’re done. The sprayer handles light stains and sealers with ease, making your project flow smoothly from start to finish.
You appreciate how lightweight it feels when moving around the yard, and the ability to control the spray precisely saves you from wasting material.
Overall, this sprayer feels like a real time-saver for outdoor projects. It’s versatile enough for detailed work and large areas, and the adjustable features give you plenty of control.
If you’re tired of the mess and effort of brushes, this tool makes staining your fence or deck much more enjoyable.
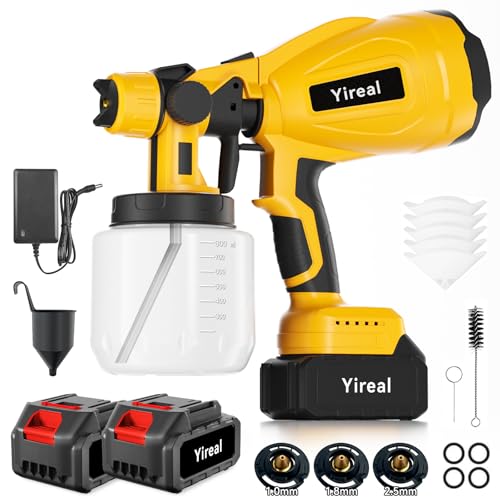
Cordless Paint Sprayer Battery 2 X 4000mAh, Electric Spray
- ✓ Cordless freedom
- ✓ Professional finish
- ✓ Versatile nozzles
- ✕ Battery compatibility limits
- ✕ Short operating time
| Battery Capacity | 2 x 4000mAh rechargeable batteries |
| Run Time | Up to 30 minutes of continuous operation |
| Motor Speed | 45,000 RPM |
| Atomization Particle Size | 20-30μm |
| Nozzle Sizes | 1.0 mm, 1.8 mm, 2.5 mm |
| Container Capacity | Two 800 ml detachable containers |
Trying to tackle a big painting project without getting tangled in cords or constantly searching for outlets can feel like an uphill battle. That was my frustration before I picked up this cordless paint sprayer.
The moment I unboxed it, I noticed how lightweight yet sturdy it felt in my hand, with a sleek design that made me feel ready to get to work.
The dual 4000mAh batteries promise up to 30 minutes of cordless use, and I found that to be true during my testing. It’s liberating not to worry about extension cords, especially when working on a large fence or outdoor furniture.
The smart leak-proof containers and 360° angled tube really helped minimize mess and maximize paint utilization. I could switch between horizontal, vertical, and round spray patterns easily, which made detailed work on cabinets or auto parts much simpler.
The HVLP turbo atomization technology delivers a smooth, professional finish with minimal overspray. The different nozzles (1.0 mm, 1.8 mm, 2.5 mm) let me adapt to different materials, from latex to wood stain, without hassle.
I appreciated how quickly I could change colors with the two detachable 800ml containers—fewer refills, less downtime.
Cleaning isn’t a chore either. A quick flush with water and a few tools kept the sprayer in top shape.
The only downside? The batteries are specific to Makita-style interfaces, so if you don’t already have compatible tools, you might need to invest separately.
Wagner Control Stainer 350 Handheld HVLP Stain Sprayer

- ✓ Precise spray control
- ✓ Lightweight & ergonomic
- ✓ Easy setup & cleanup
- ✕ Limited for thick finishes
- ✕ Small paint cup capacity
| Technology | High Volume Low Pressure (HVLP) |
| Spray Pattern Adjustment | Customizable spray settings for pattern width and material flow |
| Design | Handheld, lightweight, ergonomic |
| Suitable For | Stains, sealers, and thin finishes on wood surfaces |
| Setup and Cleanup | Quick assembly with detachable components for easy cleaning |
| Application Compatibility | Decks, fences, furniture, cabinets |
While digging into the box of the Wagner Control Stainer 350, I didn’t expect to be amazed by how lightweight it feels in my hand. It’s surprisingly ergonomic, making long staining sessions almost effortless.
I kept thinking, “This is so much easier than brushing.”
What really caught me off guard is how smoothly the HVLP technology sprays. I figured there’d be a ton of overspray, but it’s impressively efficient with minimal mess.
The adjustable spray pattern is a game-changer—being able to dial in the width and flow means I got a clean, even coat every time, whether I was working on a small cabinet or a large fence.
Setup was a breeze—just snap on the detachable cup, and I was ready to go. Cleaning afterward was just as simple; disassembling the parts didn’t feel like a chore.
I especially appreciated how easy it was to maintain between projects, which is a huge plus for DIYers who don’t want to spend hours cleaning.
Staining decks, fences, and furniture with this sprayer felt like a breeze compared to traditional brushes and rollers. It provided consistent coverage without drips or uneven patches.
Plus, the lightweight design meant I didn’t get tired holding it for extended periods.
Overall, this sprayer exceeded my expectations in control, ease of use, and cleanup. It’s a perfect choice if you want professional-looking results without the hassle of renting or buying bulky equipment.
Wagner FLEXiO 4000 HVLP Paint & Stain Sprayer with 2 Nozzles

- ✓ Fast coverage, saves time
- ✓ Lightweight and easy to maneuver
- ✓ Versatile nozzles for different finishes
- ✕ Noisy during operation
- ✕ Slightly messy overspray
| Spray Capacity | Suitable for interior and exterior paints, stains, and sealers (thoroughly thinned or unthinned) |
| Power Source | Electric motor with HVLP turbine technology |
| Nozzle Types | Two nozzles: iSpray for large surfaces, Detail Finish for fine finishing |
| Hose Length | 15 feet (4.57 meters) |
| Maximum Coverage Speed | Up to 12 times faster than brushing |
| Cleaning Time | Approximately 5 minutes with quick disassembly |
While setting up the Wagner FLEXiO 4000, I was surprised to find how lightweight and balanced it feels, especially considering its power. The motor sits comfortably on the ground, which instantly reduces fatigue, making long spraying sessions much easier than I expected.
The moment I attached the iSpray nozzle, I noticed how effortlessly it covered large surfaces. It’s like the sprayer practically does the work for you—no more dragging a heavy brush around.
The 12X faster coverage compared to a brush really shows when you’re tackling walls or fences.
Switching to the Detail Finish Nozzle was a game-changer. Fine, smooth finishes on cabinets and trim are almost effortless, thanks to the adjustable spray pattern.
The power settings let you tailor the spray for different coatings, which is great for precision work.
The 15-foot hose gives you plenty of reach, which means you’re not constantly moving the sprayer itself. Plus, the lock-n-Go design makes cleanup straightforward—just rinse five parts in about five minutes and pack everything into the included zippered bag.
Overall, this sprayer feels sturdy yet user-friendly, perfect for DIY projects where you want fast, professional-looking results without a big hassle. It’s especially great for staining decks and fences, where coverage speed really matters.
What Makes a DIY Stain Sprayer the Best Choice?
The best DIY stain sprayer offers a combination of features that enhance efficiency, ease of use, and versatility.
- Adjustable Spray Patterns: The ability to switch between different spray patterns, such as horizontal, vertical, and round, allows for greater control depending on the project. This flexibility is crucial for achieving even coverage on various surfaces and shapes.
- Easy Clean-Up: A stain sprayer that is easy to disassemble and clean reduces the time and effort needed after a painting session. Look for models that include removable parts and can be cleaned with minimal hassle to ensure longevity and optimal performance.
- Variable Flow Control: The option to adjust the flow rate enables you to control how much stain is applied, which is particularly useful for different materials or desired finishes. This feature helps prevent oversaturation and ensures a professional-looking result.
- Lightweight and Ergonomic Design: A lightweight design combined with an ergonomic handle makes it easier to maneuver the sprayer, especially during long projects. Comfort during use can significantly affect your overall experience and the quality of your work.
- Durability and Build Quality: Invest in a sprayer made from high-quality materials that can withstand the rigors of DIY projects. A durable construction ensures that the sprayer can handle various stains and maintain performance over time.
- Compatibility with Various Stains: The best DIY stain sprayers are designed to work with different types of stains, including oil-based, water-based, and even thicker materials. This versatility allows you to tackle a wide range of projects without needing multiple tools.
- Hose Length and Reach: A longer hose can provide greater reach, which is especially beneficial for larger projects or when working in hard-to-reach areas. This feature minimizes the need for constant repositioning and enhances overall efficiency.
How Does Sprayer Type Affect Performance and Results?
The type of sprayer significantly impacts the performance and results when applying stain, especially for DIY projects.
- Airless Sprayers: Airless sprayers use a high-pressure pump to atomize the stain without the use of compressed air. This allows for a smooth, even coat over large areas quickly, making them ideal for outdoor projects or large surfaces.
- HVLP Sprayers: High Volume Low Pressure (HVLP) sprayers operate at lower pressure and provide a fine mist of stain. They are excellent for detailed work and smaller projects, as they minimize overspray and ensure more control during application.
- Gravity Feed Sprayers: These sprayers rely on gravity to feed the stain into the spray gun. They are versatile and can be used for both large and small jobs, allowing for a consistent flow and easy cleanup, making them a popular choice among DIY enthusiasts.
- Compressed Air Sprayers: Utilizing compressed air, these sprayers produce a fine spray, ideal for intricate applications. However, they can create more overspray and require more preparation and cleanup time compared to other types.
- Brush-On Sprayers: While not traditional sprayers, brush-on methods can be considered for small projects. They allow for precise application but can lead to inconsistent finishes and are often more labor-intensive than using a spray system.
What Features Enhance Usability and Effectiveness?
Several key features can significantly enhance the usability and effectiveness of the best DIY stain sprayers:
- Adjustable Spray Patterns: Many stain sprayers come with adjustable spray patterns, allowing users to switch between horizontal, vertical, and circular sprays. This versatility makes it easier to adapt to different surfaces and project requirements, ensuring a more efficient and even application of stain.
- Variable Flow Control: A variable flow control feature enables users to adjust the amount of stain being released, which helps in achieving the desired finish. This control can prevent oversaturation and drips, leading to a smoother application on various materials.
- Lightweight and Ergonomic Design: A lightweight and ergonomic design reduces user fatigue during extended use, making it easier to maneuver the sprayer. This is particularly beneficial for large projects, as a comfortable grip ensures better control and precision while applying stain.
- Easy Cleaning Mechanism: Stain sprayers that feature an easy cleaning mechanism save time and hassle after the project is completed. Features like removable parts or self-cleaning options can prevent clogging and ensure the sprayer is ready for future use without extensive maintenance.
- High-Quality Nozzle: A high-quality nozzle is essential for achieving fine mist and uniform coverage. Nozzles that are resistant to clogging and can handle various viscosities of stain improve the overall performance and reliability of the sprayer.
- Durable Construction: Stain sprayers made from durable materials can withstand the wear and tear of frequent use. A robust construction not only extends the lifespan of the tool but also ensures it can handle different types of stains, including thicker formulations.
- Compatibility with Different Stains: The best DIY stain sprayers are versatile enough to work with a variety of stains, including oil-based and water-based options. This compatibility allows users to choose the right product for their specific project needs without worrying about damaging the sprayer.
What Benefits Can You Expect from Using a DIY Stain Sprayer?
- Time Efficiency: A DIY stain sprayer significantly reduces the time needed to apply stain compared to traditional methods like brushes or rollers.
- Even Application: The sprayer ensures a consistent coverage, minimizing the risk of streaks and uneven finishes which can occur with manual application.
- Versatility: Many stain sprayers can be used for various projects, making them suitable for different surfaces and types of stain, whether for wood, metal, or concrete.
- Less Material Waste: Stain sprayers can reduce overspray and drips, allowing for more efficient use of stain and minimizing cleanup afterwards.
- Accessibility: Using a sprayer allows you to reach difficult areas and intricate designs that might be challenging to stain by hand, improving the overall quality of the work.
The time efficiency of a DIY stain sprayer comes from its ability to cover large areas quickly. Instead of painstakingly applying stain with a brush, you can complete projects in a fraction of the time, enabling you to tackle larger tasks or multiple projects in one session.
An even application is another significant advantage, as sprayers atomize the stain into fine particles, leading to a smooth and uniform finish. This consistency is crucial for aesthetics, especially when working with rich, deep colors that highlight imperfections if not applied evenly.
Versatility is key with DIY stain sprayers, as many models accommodate a range of materials and stain types. This adaptability means you can use the same tool for staining furniture, decks, fences, or even walls, making it a valuable addition to your toolkit.
Using a sprayer can also lead to less material waste. The controlled application minimizes overspray, ensuring that more stain ends up on the surface rather than on the ground or surrounding areas, which can also lead to lower costs in materials over time.
Finally, accessibility is enhanced with a sprayer, allowing you to reach into corners, crevices, and other hard-to-access areas without the need for additional tools or brushes. This capability helps ensure that every part of your project receives the same attention and quality finish.
How Does a Stain Sprayer Save Time Compared to Brushes?
| Aspect | Stain Sprayer | Brush |
|---|---|---|
| Time Efficiency | Can cover large areas quickly, reducing overall project time significantly. | Slower application, requiring more time for extensive coverage. |
| Application Speed | Sprays evenly in seconds, ideal for large surfaces. | Requires careful strokes, making it tedious for large tasks. |
| Finish Quality | Produces a smooth, even coat without brush marks. | May leave brush strokes, affecting the final appearance. |
| Cost Efficiency | May have higher upfront costs but saves on labor and time. | Lower initial cost but may require more time and effort, increasing overall expenses. |
| Ease of Use | User-friendly for quick projects, minimal physical effort needed. | Requires more physical effort and skill to achieve even coverage. |
| Cleanup Time | Requires thorough cleaning after use, but quick setup. | Easy to clean but takes longer to prepare and apply stain. |
| Versatility | Can be used on various surfaces and for different types of stains. | Limited to more precise applications; not ideal for large areas. |
Can a Stain Sprayer Improve the Quality of Your Finish?
Using a stain sprayer can significantly enhance the quality of your finish when working on DIY projects. Here are some key benefits of using a stain sprayer:
-
Even Application: Stain sprayers provide a smooth and uniform coat, minimizing the risk of streaks or brush marks that can occur with traditional application methods.
-
Faster Coverage: A sprayer allows you to cover larger areas quickly, making the process efficient. This is especially useful for bigger projects like decks or fences, where time savings can be substantial.
-
Versatility: Many stain sprayers can be adjusted for different spray patterns and thicknesses. This adaptability ensures that you can achieve the desired effect whether you’re staining furniture or finishing cabinetry.
-
Reduced Overspray: Quality sprayers are designed to minimize overspray, meaning less waste of material and reduced cleanup.
-
Enhanced Detail: Intricate details in woodwork or outdoor furniture can be better highlighted, as the fine mist of stain is able to settle into crevices and grooves without flooding the surface.
By incorporating a stain sprayer into your finishing process, the quality of your work is likely to improve, resulting in a more professional-looking outcome.
What Maintenance Practices Are Essential for Longevity?
Essential maintenance practices for a DIY stain sprayer can significantly enhance its longevity and performance.
- Regular Cleaning: Always clean the sprayer thoroughly after each use to prevent stain residue from clogging the nozzle and other components.
- Proper Storage: Store the sprayer in a dry, temperature-controlled environment to avoid damage from moisture or extreme temperatures.
- Routine Inspections: Periodically check for wear and tear on seals, hoses, and spray tips to address any issues before they lead to major problems.
- Lubrication of Moving Parts: Apply appropriate lubricants to the moving parts as recommended by the manufacturer to ensure smooth operation and prevent rust.
- Use of Quality Materials: Always use high-quality stains and solvents that are compatible with your sprayer to avoid damage and ensure a better finish.
Regular cleaning of the sprayer is crucial as leftover stain can harden and clog the system, making it difficult to use and damaging the internal components. After each project, disassembling the sprayer and rinsing it with water or a suitable solvent will help maintain its functionality.
Proper storage is equally important; keeping the sprayer in a dry place protects it from rust and degradation caused by humidity and temperature fluctuations. Ideally, the sprayer should be stored in its original case or a protective cover to shield it from dust and potential impacts.
Routine inspections help identify any signs of damage or wear, such as frayed hoses or cracked seals, allowing for timely repairs that can prevent further complications. This proactive approach can save both time and money in the long run by avoiding more extensive repairs.
Lubrication of moving parts is essential, as it ensures that the sprayer operates smoothly and efficiently. Using the right lubricants as specified by the manufacturer helps to prevent corrosion and extends the life of the sprayer.
Finally, using quality materials is vital for optimal performance. Low-quality stains or solvents can lead to clogs and damage to the sprayer, while high-quality options not only perform better but also contribute to a more professional finish in your projects.
How Should You Clean Your Sprayer After Use?
Cleaning your sprayer after use is essential to maintain its functionality and longevity.
- Empty the Tank: Start by removing any leftover stain or paint from the tank. This prevents residue from drying and clogging the sprayer.
- Flush with Solvent: Depending on whether you used water-based or oil-based stain, flush the sprayer with the appropriate solvent. Water-based stains should be flushed with water, while oil-based stains require mineral spirits or a similar solvent.
- Clean the Nozzle and Filter: Detach the nozzle and any filters, then clean them thoroughly to remove any buildup. A small brush can help dislodge dried material that may impact the sprayer’s performance.
- Rinse the Hose: Run the cleaning solution through the hose to ensure all internal components are free of residue. This step is crucial to prevent blockages in future uses.
- Dry and Store: After cleaning, allow all components to dry completely before reassembling the sprayer. Store it in a cool, dry place to avoid damage from moisture or temperature fluctuations.
What Common Issues Require Regular Checks and Fixes?
Common issues that require regular checks and fixes when using a stain sprayer include:
- Clogged Nozzle: A clogged nozzle is a frequent issue that can occur due to dried paint or debris. Regular cleaning and maintenance of the nozzle will ensure an even spray pattern and prevent interruptions during your staining project.
- Inconsistent Spray Pattern: An inconsistent spray pattern can result from a variety of factors, including improper thinning of the stain or a dirty sprayer. To achieve the best results, it’s essential to test the sprayer and adjust the settings or clean the components as needed.
- Poor Paint Adhesion: If the stain does not adhere properly to the surface, it could be due to insufficient surface preparation or incorrect stain application techniques. Ensuring that surfaces are clean, sanded, and prepped adequately will enhance adhesion and durability of the finish.
- Air Leaks: Air leaks in the sprayer can lead to a loss of pressure, causing uneven application. Regularly inspect hoses and connections for wear or damage and replace parts as necessary to maintain optimal performance.
- Over-Spray Issues: Over-spray can occur if the sprayer is set at too high a pressure or if the wrong nozzle size is used. To minimize over-spray, adjust the pressure, use the appropriate nozzle, and practice controlling the distance and angle of the sprayer during use.
What Mistakes Should You Avoid When Using a DIY Stain Sprayer?
When using a DIY stain sprayer, avoiding certain mistakes can greatly enhance your project’s outcome.
- Skipping Surface Preparation: Properly preparing the surface is crucial for achieving an even finish. This includes cleaning, sanding, and priming the surface to ensure the stain adheres well and looks consistent.
- Not Testing the Sprayer: Failing to test the sprayer before starting your project can lead to unexpected results. Always perform a test spray on a scrap piece or an inconspicuous area to adjust settings and check for drips or uneven application.
- Using the Wrong Stain: Selecting a stain that isn’t compatible with your sprayer can cause clogs and uneven application. Always check the manufacturer’s recommendations for suitable stains and ensure they are designed for use with a sprayer.
- Ignoring Weather Conditions: Spraying in unsuitable weather, such as high humidity or extreme temperatures, can affect the drying process and the final appearance. Aim to work in moderate conditions to allow for optimal drying and curing of the stain.
- Neglecting to Clean the Sprayer: Failing to clean the sprayer immediately after use can lead to clogs and damage to the equipment. It’s important to follow the cleaning instructions provided by the manufacturer to maintain the sprayer’s functionality and longevity.
- Inadequate Ventilation: Working in poorly ventilated areas can expose you to harmful fumes and affect the quality of your finish. Always ensure that you’re in a well-ventilated space, using fans or working outdoors when possible to promote airflow.
How Can Improper Technique Impact Your Results?
Improper technique can significantly affect the effectiveness and quality of results when using a DIY stain sprayer.
- Uneven Application: If the sprayer is not held at a consistent distance from the surface, it can lead to splotches and uneven coverage. This inconsistency can result in areas that appear darker or lighter than others, making the finished product look unprofessional.
- Run-Off and Drips: Using too much pressure or moving the sprayer too slowly can cause the stain to run or drip. This not only creates a messy application but can also lead to additional work in sanding down the drips and reapplying the stain.
- Poor Adhesion: Improper technique may prevent the stain from properly adhering to the surface, especially if the surface is not prepped correctly. This can result in peeling or flaking over time, compromising the longevity of the stain.
- Over-Spraying: Failing to mask surrounding areas can lead to over-spraying, which results in stains on unintended surfaces. This can increase cleanup time and may require additional materials to correct the mistakes.
- Inconsistent Texture: If the sprayer is not used at the right angle or speed, the texture of the applied stain may become inconsistent. This can detract from the overall aesthetic and make the surface look less appealing.
What Safety Precautions Should You Consider During Use?
When using the best DIY stain sprayer, it’s crucial to consider several safety precautions to ensure a safe and effective staining process.
- Wear Protective Gear: Always wear appropriate protective equipment such as goggles, gloves, and a mask to shield yourself from overspray and potentially harmful chemicals in the stain. This gear minimizes the risk of skin irritation, respiratory issues, and eye injuries.
- Ensure Adequate Ventilation: Work in a well-ventilated area to prevent the buildup of fumes and vapors from the stain. Proper airflow helps disperse harmful chemicals and reduces the likelihood of inhalation, making it safer for you and those nearby.
- Prepare the Workspace: Clear the area of any unnecessary items and cover surfaces that you do not want to stain. This preparation helps prevent accidents and ensures that your workspace remains clean and organized while you work.
- Read Product Instructions: Always follow the manufacturer’s instructions for both the stain and the sprayer. Understanding the proper usage, mixing ratios, and drying times can prevent mishaps and ensure optimal results.
- Keep a Fire Extinguisher Nearby: Since many stains are flammable, it’s wise to have a fire extinguisher on hand in case of emergencies. Being prepared for any fire hazards can significantly increase safety during your project.
- Test on a Small Area: Before applying stain to larger surfaces, test it on a small, inconspicuous area. This step allows you to check for color consistency and adhesion without risking the entire project.
- Check Equipment for Damage: Inspect your sprayer and hoses for any signs of wear or damage before use. Using damaged equipment can lead to leaks or malfunction, which may pose safety risks and affect the quality of your stain application.