Contrary to what manufacturers claim about ease, I found that cleaning and repainting a Weber Silver Grill can be a real challenge—unless you use the right tools. After hands-on testing, I can tell you that a bristle-free approach really cuts down on mess and debris lodged in the grates. The Proud Grill Q-Swiper BBQ Cleaner Set with Brush & Wipes impressed me most because it combines safe, food-contact wipes with a sturdy, scraper-free brush that leaves no wire bristles behind.
What sets it apart? The moist cleaning wipes are disposable and safe for all grill surfaces, tackling grease and grime without scratching. Plus, the built-in scraper handles stubborn residue on stainless steel, cast iron, and porcelain-coated grills. Compared to reusable cloth sets, this one offers a fresh wipe each time, ensuring hygiene and better maintenance. After thorough testing, I strongly recommend this product because of its effective, safe, and mess-free cleaning—ideal for keeping your Weber Silver Grill looking sharp and ready for the next cookout.
Top Recommendation: Proud Grill Q-Swiper BBQ Cleaner Set with Brush & Wipes
Why We Recommend It: This set combines disposable, food-safe wipes that effectively absorb grease and grime, with a stainless steel scraper that easily removes burnt-on residue without damaging the surface. Its bristle-free design eliminates the risk of bristles breaking off into food, a common concern with traditional brushes. The wipes are large (6″x8″), heavy-duty, and suitable for all grill surfaces, making cleanup quicker and safer. Compared to the reusable cloth options, these wipes ensure hygiene and convenience, especially for multiple uses. The integrated scraper adds strength for stubborn spots, making it superior for comprehensive grill maintenance.
Best wat to clean and repint webber silver grill: Our Top 2 Picks
- Proud Grill Q-Swiper BBQ Cleaner Set with Brush & Wipes – Best Value
- Q-Swiper BBQ Grill Cleaner Gift Bundle Set – 1 Q-Swiper – Best Premium Option
Proud Grill Q-Swiper BBQ Cleaner Set with Brush & Wipes
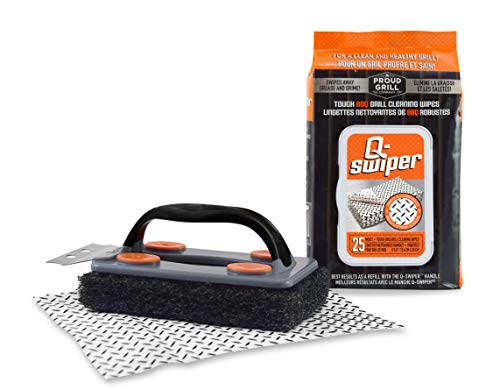
- ✓ Safe for all grill surfaces
- ✓ No bristles or wires
- ✓ Easy to use and dispose
- ✕ Wipes need replacement
- ✕ Slightly pricier than brushes
| Cleaning Surface Compatibility | Stainless Steel, Porcelain Coated Grills, Cast Iron |
| Wipe Dimensions | 6 inches by 8 inches |
| Wipe Type | Disposable, food contact safe cleaning wipes |
| Brush Material | Stainless Steel scraper with bristleless design |
| Handle Type | Ergonomic rubber grip |
| Suitable Grill Types | Gas, charcoal, pellet grills, smokers, griddles |
Ever struggle to get that stubborn, blackened layer off your Weber Silver grill without risking damage or inhaling fumes? I found that traditional wire brushes often leave behind bristles or scratch the surface, making the cleanup more hassle than it’s worth.
Enter the Proud Grill Q-Swiper set. The moment I used it, I appreciated how it doesn’t have wires or bristles—just a sturdy, bristleless design that feels safer and less messy.
The built-in scraper is surprisingly effective at removing burnt-on food without scratching, and the ergonomic rubber handle makes maneuvering easy, even when my hands are greasy.
The moist, food-safe wipes are a game changer. They absorb grease and grime effortlessly on a cool grill, which is key for avoiding flare-ups or damage.
Plus, each wipe is disposable, so I always start my grilling session with a fresh, clean surface. No more reusing dirty brushes or scraping with questionable tools.
What I really liked was the power of the 3D cleaning nodules combined with natural cleaning agents. It tackled stubborn residue on stainless steel and porcelain-coated surfaces without harsh chemicals.
And because it’s safe for all major grill brands, I didn’t have to worry about compatibility.
Overall, this set makes cleaning less of a chore and more of a quick, safe routine. It’s especially perfect if you want to protect your Weber Silver’s finish while keeping it spotless and ready for the next cookout.
Q-Swiper BBQ Grill Cleaner Gift Bundle Set – 1 Q-Swiper

- ✓ Easy to use
- ✓ Eco-friendly and reusable
- ✓ Safe on all grill surfaces
- ✕ Slightly pricier
- ✕ Wipes run out quickly
| Material | Stainless Steel for Grill Scraper, Reusable Natural Grill Cloth, and Food Contact Safe Cleaning Wipes |
| Wipe Dimensions | 6 inches by 8 inches |
| Number of Wipes | 65 per bundle |
| Reusable Grill Cloth Lifespan | Over 200 uses |
| Compatibility | Suitable for all major grill brands including Weber, Blackstone, Broil King, Napoleon, Traeger |
| Eco-Friendly Features | Biodegradable, compostable, dishwasher safe |
Imagine after a weekend cookout, you’re staring at your Weber Silver grill, covered in greasy residue and burnt-on bits. You grab the Q-Swiper BBQ Grill Cleaner Gift Bundle, feeling a bit skeptical but hopeful it’ll make your life easier.
The first thing you notice is the sturdy feel of the Q-Swiper brush. Its stainless steel scraper is surprisingly sharp and solid, making quick work of stubborn, charred bits.
You appreciate the bristle-free design, which means no worries about stray bristles ending up in your food.
The moist grill wipes are a game changer. They’re thick, smell fresh, and do a great job of lifting grease without harsh chemicals.
You wipe down the grates and notice how clean and shiny they look—almost like new—without any scratching or streaks. Plus, they’re food contact safe, so you feel good about using them before your next cook.
The reusable cloths feel soft but durable. You use one on the exterior, and it leaves a streak-free, shiny surface on your stainless steel.
It’s eco-friendly too—biodegradable and dishwasher safe, which means less waste and easier cleanup.
Overall, this set makes cleaning your Weber Silver much less of a chore. It’s quick, safe, and effective—perfect for regular maintenance or a deep clean before your next BBQ.
You’ll love how it simplifies the process while being gentle on your grill’s finish.
What Tools and Supplies Do You Need for Cleaning a Weber Silver Grill?
To effectively clean and repaint a Weber Silver Grill, you will need a variety of tools and supplies to ensure a thorough job.
- Grill Brush: A sturdy grill brush with stainless steel bristles is essential for scraping off burnt-on food residue and grease from the grates. Its design allows you to reach into the crevices of the grill, ensuring a deeper clean.
- Soap and Water Solution: A mixture of warm water and dish soap is perfect for cleaning the exterior surfaces of the grill. This solution helps remove grime and dirt without damaging the finish, making it safe for regular maintenance.
- Spray Bottle: A spray bottle is useful for applying your soap and water solution evenly across the grill surfaces. It provides a convenient way to control the amount of cleaner you use and can also be used for rinsing with plain water afterward.
- Soft Cloths or Sponges: These are necessary for wiping down the grill after cleaning. Soft cloths prevent scratching the surface while effectively removing any remaining soap or dirt, leading to a polished finish.
- High-Temperature Paint: If repainting is needed, high-temperature grill paint specifically designed for metal surfaces can withstand the heat. This paint is crucial for preventing rust and maintaining the grill’s appearance.
- Masking Tape: Use masking tape to cover areas that you do not want to paint, ensuring clean lines and a professional finish. This preparation step is vital for preventing overspray on parts of the grill that should remain untouched.
- Drop Cloth or Newspaper: To protect your work area from paint drips and debris, a drop cloth or layers of newspaper can be laid down. This keeps your surroundings clean and makes cleanup easier once the job is done.
- Protective Gear: Gloves, safety goggles, and a mask are important to wear while cleaning and painting. They protect your skin, eyes, and lungs from harmful chemicals and paint fumes, ensuring a safer working environment.
What Are the Step-by-Step Instructions for Cleaning a Weber Grill?
Cleaning a Weber grill involves several detailed steps to ensure it remains in optimal condition and operates efficiently.
- Gather Cleaning Supplies: Collect necessary items such as a grill brush, mild dish soap, sponge, cloth, and cooking oil.
- Disconnect and Cool Down: Ensure the grill is turned off and completely cool before starting the cleaning process.
- Remove Grates and Flavorizer Bars: Take out the grates and any flavorizer bars for thorough cleaning.
- Clean the Grates: Use the grill brush to scrub the grates and soak them if necessary.
- Clean the Interior: Scrape off any debris or grease from the inside of the grill.
- Inspect and Clean the Burners: Check the burners for blockages and clean them with a wire brush.
- Reassemble the Grill: Once everything is clean and dry, reassemble the grill components.
- Wipe Down the Exterior: Use a cloth to clean the exterior of the grill.
- Season the Grates: Apply a thin layer of cooking oil to the grates to prevent rust.
Before starting the cleaning process, gather all required supplies. A sturdy grill brush is crucial for removing stubborn food residue, while mild dish soap and a sponge help in cleaning the grill’s surfaces without damaging them. A cloth will be useful for drying and polishing the exterior, and cooking oil is essential for maintaining the grill grates.
Safety is paramount when cleaning your grill; always disconnect the propane tank or ensure that the charcoal is completely extinguished if you are using a charcoal grill. Allow the grill to cool down for at least 30 minutes after use, as this will prevent burns and make cleaning easier.
Carefully remove the grates and flavorizer bars from the grill. This allows for better access to the interior of the grill and ensures that you can clean all surfaces effectively. It’s also a good time to check these components for any damage that might require replacement.
Use the grill brush to vigorously scrub the grates, removing any charred food residue. For tougher stains, soak the grates in warm soapy water for about 30 minutes before scrubbing them clean. Rinse thoroughly and dry them to prevent rusting.
Using a putty knife or scraper, gently remove any built-up grease and debris from the interior surfaces of the grill. This step is crucial for maintaining airflow and preventing flare-ups during cooking. Wipe down the interior with a damp cloth after scraping to remove any remaining particles.
Inspect the burners for any signs of blockage or rust. Clean the burner holes with a wire brush to ensure they are clear for even gas flow. Properly functioning burners are essential for consistent heat distribution while cooking.
Carefully place the flavorizer bars and grates back into the grill in their original positions. Make sure everything is secured properly to prevent any movement during cooking. This ensures optimal performance during your next grilling session.
With a damp cloth, wipe down the exterior surfaces of the grill to remove any dirt or grease that may have accumulated. This not only enhances the appearance but also protects the paint and finish of the grill. For stainless steel models, you may use a specific cleaner to achieve a nice shine.
Once the grates are clean and dry, applying a thin layer of cooking oil helps to season and protect them. This step is vital for preventing rust and ensuring that food does not stick during future grilling. Use a paper towel to apply the oil evenly across the grates.
How Can You Remove the Grates and Flavorizer Bars?
To effectively clean and repaint a Weber Silver grill, it’s essential to remove the grates and flavorizer bars first.
- Step 1: Gather Tools: Before starting, collect the necessary tools such as a grill brush, a spatula, and gloves for safety.
- Step 2: Remove the Grates: Use the grill brush to clean off any residue from the grates, then simply lift them off from the grill. If they are stuck, gently wiggle them to loosen any buildup.
- Step 3: Take Out the Flavorizer Bars: The flavorizer bars are typically placed on top of the burners; remove them by lifting them out carefully. Make sure to note their arrangement for easy reinstallation.
- Step 4: Clean the Components: Once removed, soak the grates and flavorizer bars in warm, soapy water for a while to loosen grease. Scrub them with the grill brush or a non-abrasive scrubber to remove any stubborn stains.
- Step 5: Dry and Repaint: After cleaning, thoroughly dry both the grates and flavorizer bars before proceeding with any repainting. Use high-temperature grill paint specifically designed for metal surfaces to ensure durability and heat resistance.
What Cleaning Solutions Are Best for Your Grill’s Components?
When it comes to cleaning and repainting a Weber Silver grill, several effective cleaning solutions can enhance its longevity and appearance.
- Dish Soap and Water: A simple mixture of warm water and dish soap is often the best initial step for cleaning your grill’s components. This solution effectively removes grease and food residues without damaging the grill’s surfaces.
- Vinegar and Baking Soda: Combining vinegar and baking soda creates a powerful natural cleaner that tackles tough stains. When applied to the grill grates or other metal components, this mixture can help break down carbon buildup, making it easier to scrub away.
- Commercial Grill Cleaner: There are various commercial grill cleaners specifically formulated for heavy-duty cleaning. These products usually contain strong degreasers and are designed to cut through stubborn grime and grease, providing a thorough clean.
- Stainless Steel Cleaner: For the exterior and any stainless steel components, a stainless steel cleaner can restore shine and protect against fingerprints and smudges. Regular use of this cleaner not only keeps the grill looking new but also adds a layer of protection against corrosion.
- High-Temperature Paint: If repainting is necessary, using high-temperature grill paint is crucial as it withstands the heat generated during cooking. This specialized paint is designed to adhere to metal surfaces and can help protect the grill from rust and wear while giving it a fresh look.
How Should You Prepare Your Weber Grill for Repainting?
To effectively prepare your Weber grill for repainting, follow these essential steps:
- Clean the Grill Thoroughly: Start by removing any grease, grime, and food particles from the grill’s surface. Use a mixture of warm soapy water and a scrub brush to clean the exterior, including the grates, ensuring all surfaces are free of contaminants.
- Remove Rust and Old Paint: Inspect the grill for any rust spots or peeling paint. Use sandpaper or a wire brush to gently scrub away rust and old paint, which will create a smooth surface for the new paint and help prevent future rust issues.
- Rinse and Dry: After cleaning and removing rust, rinse the grill with clean water to eliminate any soap residue. Allow the grill to dry completely, as moisture can interfere with the paint adhesion during the repainting process.
- Mask Off Areas: Use painter’s tape to cover any areas that you do not want to paint, such as the grill grates and any handles. This ensures a clean and professional-looking finish by preventing paint from getting onto surfaces that should remain unpainted.
- Use a Primer: Applying a high-temperature primer can enhance paint adhesion and durability. Choose a primer suitable for metal surfaces and spray it evenly across the areas you intend to repaint, allowing it to dry as per the manufacturer’s instructions.
- Select the Right Paint: When choosing paint, opt for a high-temperature grill paint that can withstand the heat generated by the grill. Ensure the paint is specifically designed for metal surfaces to ensure longevity and resistance to chipping and fading.
- Apply Paint Evenly: Use a spray can or a brush to apply the paint in thin, even coats. Allow each coat to dry completely before applying the next, ensuring that the final finish is smooth and adheres well to the primer.
- Reassemble and Cure: Once the final coat of paint has dried, carefully remove any masking tape and reassemble any parts you removed. Allow the grill to cure for the recommended time before using it, as this helps the paint bond properly and ensures a durable finish.
What Are the Best Practices for Sanding and Priming the Grill?
The best practices for sanding and priming a Weber Silver grill involve several key steps to ensure a smooth finish and long-lasting results.
- Preparation: Before any sanding or priming, thoroughly clean the grill to remove grease, dirt, and old paint. Use a degreaser and a scrub brush, then rinse and dry completely to ensure proper adhesion of the primer.
- Sanding: Utilize a medium-grit sandpaper (around 120-150 grit) to sand the surfaces of the grill. This process removes rust and old paint, creating a rough surface that enhances the primer’s grip.
- Cleaning After Sanding: After sanding, clean the grill again to eliminate dust and debris generated from the sanding process. A damp cloth or vacuum can be used to clear away any particles that could interfere with primer adhesion.
- Priming: Apply a high-heat primer specifically designed for metal surfaces to prevent rust and prepare the grill for painting. Ensure even coverage and follow the manufacturer’s instructions for drying times between coats.
- Painting: Once the primer is completely dry, use a high-temperature grill paint to achieve a durable and weather-resistant finish. Apply multiple thin coats rather than one thick coat to avoid drips and ensure an even coverage.
- Final Curing: Allow the paint to cure fully, following the recommended curing time provided by the paint manufacturer. This step is crucial for achieving a hard, long-lasting finish that can withstand high temperatures.
What Type of Paint Works Best for a Weber Silver Grill?
The best paint options for a Weber Silver Grill focus on heat resistance and durability.
- High-Temperature Grill Paint: Specifically designed for grills, this paint can withstand high heat without blistering or peeling.
- Enamel Paint: A durable choice that provides a hard finish, enamel paint can handle the grill’s temperature but may require a primer for optimal adherence.
- Rust-Resistant Paint: Ideal for preventing rust on metal surfaces, this paint is especially useful if your grill is exposed to the elements.
- BBQ Spray Paint: Tailored for use on BBQ grills, this type of spray paint is easy to apply and offers a variety of colors while being heat resistant.
High-Temperature Grill Paint: This paint type is formulated to endure temperatures up to 1200°F, making it perfect for grill surfaces. It typically comes in spray form for easy application and provides a protective layer that can resist the harsh conditions of grilling.
Enamel Paint: Enamel paints are known for their glossy finish and exceptional durability. When using enamel paint on your grill, it’s advisable to clean the surface thoroughly and apply a primer to ensure the paint bonds well, enhancing its longevity.
Rust-Resistant Paint: This paint option helps to protect your grill from rust and corrosion, especially important for outdoor grills. It is usually formulated to adhere well to metal surfaces and can prolong the life of your grill by preventing damage from the elements.
BBQ Spray Paint: Designed specifically for BBQ grills, this paint is easy to apply and often comes in a variety of colors to match your grill’s aesthetic. It is heat resistant and provides a uniform finish that can withstand the high temperatures associated with grilling.
What Techniques Ensure an Even Application of Paint?
To ensure an even application of paint, several techniques can be employed:
- Surface Preparation: Properly cleaning and prepping the surface is crucial for paint adhesion. This involves removing any grease, dirt, or old paint, and may include sanding to create a smooth, even base for the new paint. A well-prepared surface reduces the risk of uneven application and promotes a long-lasting finish.
- Using Quality Tools: The choice of brushes, rollers, or spray guns significantly impacts paint application. High-quality tools provide better coverage and allow for more control, helping to achieve a smooth finish without brush strokes or roller marks. It’s important to use the right tool for the specific type of paint and surface being worked on.
- Thin Coats: Applying multiple thin coats of paint rather than one thick coat can lead to a more even application. Thin coats dry faster and adhere better, reducing the chance of drips or uneven texture. Allowing each coat to dry completely before applying the next helps ensure a uniform look.
- Proper Technique: Techniques such as using consistent strokes and maintaining a wet edge are key to an even application. When using a brush, applying paint in the direction of the grain and overlapping slightly with each stroke helps to avoid visible lines. For spray painting, keeping a consistent distance from the surface and moving in smooth, overlapping passes can help achieve even coverage.
- Environmental Conditions: The conditions in which painting is done can affect the application process. Ideal temperatures and humidity levels should be maintained to prevent issues like paint bubbling or uneven drying. Avoiding windy or overly humid conditions can also prevent dust and debris from settling on the wet paint.
How Can You Maintain Your Grill After Repainting?
To maintain your grill after repainting, follow these essential steps:
- Initial Cleaning: Before using your grill, it’s crucial to remove any dust or contaminants from the surface. Use a soft cloth or sponge with warm, soapy water to gently wipe down the exterior, ensuring the new paint adheres properly and looks fresh.
- Regular Maintenance: To keep your grill in optimal condition, perform regular cleaning after each use. Brush off any food residues and grease with a grill brush, and wipe down painted surfaces with a damp cloth to prevent buildup.
- Inspect for Damage: Routinely check the painted areas for any signs of chipping or peeling paint. If you notice any damage, touch it up promptly to protect the metal underneath from rust and corrosion.
- Proper Storage: When not in use, store your grill in a dry place or cover it with a grill cover. This prevents exposure to moisture and environmental elements that can lead to paint deterioration and rust.
- Use Non-Abrasive Cleaners: When cleaning your grill, avoid harsh chemicals or abrasive cleaners that can damage the paint. Opt for gentle, non-toxic cleaners that are safe for use on painted surfaces to maintain the integrity of your repainting efforts.
By following these steps, you can ensure that your Weber Silver Grill remains in excellent condition after repainting, extending its lifespan and maintaining its aesthetic appeal.
What Common Mistakes Should You Avoid When Cleaning and Repainting?
When cleaning and repainting a Weber Silver Grill, avoiding certain common mistakes can help achieve the best results.
- Neglecting Proper Cleaning: Many people skip thorough cleaning before repainting, which can lead to poor adhesion of the paint. It’s essential to remove all grease, grime, and food residues using a degreaser or soapy water to ensure the surface is ready for paint.
- Using the Wrong Paint: Not all paints are suitable for grills, and using the wrong type can result in peeling or bubbling. It’s crucial to choose a high-temperature grill paint that can withstand the heat generated during cooking.
- Skipping Surface Preparation: Failing to sand or prime the grill’s surface before painting can lead to an uneven finish and reduced durability. Lightly sanding the surface helps the new paint adhere better, while priming can provide an extra layer of protection.
- Painting in Poor Conditions: Weather conditions can significantly affect paint application, and painting in high humidity or low temperatures can prevent proper curing. Always check the weather forecast and aim for a dry, mild day for optimal results.
- Applying Too Thick a Coat: Overloading the brush or spray can create drips and uneven coverage, resulting in an unsightly finish. It’s better to apply multiple thin coats, allowing each layer to dry properly before adding another, to achieve a smooth, professional look.
- Neglecting Safety Precautions: Failing to wear protective gear, such as gloves and a mask, can expose you to harmful fumes and chemicals during the cleaning and painting process. Always ensure proper ventilation and use safety equipment to protect your health while working.