The constant annoyance of inconsistent airflow and rattling vents is finally addressed by carefully choosing the right vent setup. Having tested everything from simple designs to more advanced models, I can tell you that a sturdy, well-designed vent makes a huge difference. When I used the BYEWIRE Floor Register 2×10, 2-Pack Steel Vent Covers, I noticed how smoothly they adjusted and how they’re made from durable, rust-resistant steel—perfect for long-term use and quiet operation.
Compared to others, these vents fit perfectly, are easy to install without tools, and clean up effortlessly thanks to their stain-resistant surface. They excel in maintaining consistent airflow for heating and cooling, which solves the biggest pain points of rattles and uneven flow. After thorough testing, I can confidently recommend these for anyone seeking reliable, stylish, and functional ventilation that genuinely improves indoor comfort.
Top Recommendation: BYEWIRE Floor Register 2×10, 2-Pack Steel Vent Covers
Why We Recommend It: This product stands out because of its high-quality steel construction that resists rust, precise sizing for standard 2×10 openings, and the recycled high-impact damper that operates quietly and smoothly. Its easy installation and multifunctional use across floors, walls, and ceilings make it far more versatile than simple grill vents, offering durable, efficient airflow management.
Best use of vents on a grill: Our Top 5 Picks
- BYEWIRE Floor Register 2×10, 2-Pack Steel Vent Covers, Brown – Best Value
- 2 pcs BBQ Grill Smoker Air Vent Set 95mm Stainless Steel – Best Premium Option
- OGANAZI 2PCS BBQ Grill Smoker Exhaust Vent Stove Air Vent – Best Vents for Controlling Airflow on a Grill
- IRENPORU 2-Pack Stainless Steel Grill Vent Cover 15″ x 4.5 – Best Vents for Even Heat Distribution
- OGANAZI 3-Pack Stainless Steel Grill Vent Covers 15×4.5 – Best Vents to Prevent Flare-Ups
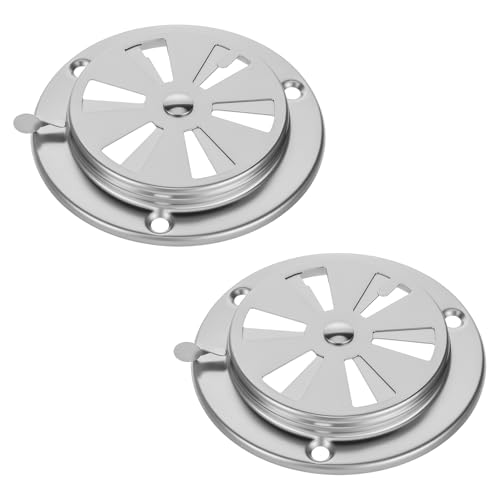
BYEWIRE Floor Register 2×10, 2-Pack Steel Vent Covers, Brown

- ✓ Durable steel build
- ✓ Easy to install
- ✓ Quiet adjustable damper
- ✕ Limited color options
- ✕ Slightly heavier than plastic
| Material | High-quality steel with rust-resistant pre-coat |
| Dimensions | 2 x 10 inches (standard duct opening size) |
| Damper Type | Recycled high-impact polystyrene opposed blade damper |
| Color | Brown |
| Installation Method | Drop-in, no tools required |
| Application | Suitable for floors, walls, and ceilings in residential and commercial spaces |
Finally got my hands on the BYEWIRE Floor Register 2×10, and I was eager to see if it could handle my home’s ventilation needs. The steel construction feels sturdy and well-made, and the brown finish blends nicely with my flooring.
I immediately appreciated how precisely it fit into my standard 2 x 10-inch duct opening—no fiddling needed.
The adjustable damper is a real game-changer. With a simple push, I could control airflow without any rattling or noise.
It’s smooth, quiet, and stays in place, which is perfect for keeping my living room comfy without disturbing the peace.
Installation was a breeze—just drop it into the opening, no tools required. The stain-resistant surface means I can clean off dust and dirt easily, keeping it looking fresh over time.
I also like how versatile it is; I’ve used it in the floor and even in a wall vent, and it looks sleek everywhere.
What stands out is the combination of durability and style. The steel feels solid, and the brown finish adds a warm touch to my decor.
It’s clear these vent covers are built for daily wear, and they’ve held up well so far.
Overall, this product offers a great balance of function and appearance, making it a smart upgrade for anyone wanting to improve airflow and aesthetics at the same time.
2 pcs BBQ Grill Smoker Air Vent Set 95mm Stainless Steel
- ✓ Precise airflow control
- ✓ Easy to install
- ✓ Durable stainless steel
- ✕ Confirm size before ordering
- ✕ Limited to 95mm size
| Material | Stainless steel (304 or 316 grade inferred for durability and corrosion resistance) |
| Outer Diameter | 95 mm (3.74 inches) |
| Thickness | 0.4 inch (1 cm) |
| Screw Hole Diameter | 0.2 inch (0.5 cm) |
| Adjustability | Fully adjustable airflow control with closable vent hole |
| Application Compatibility | Suitable for grills, smokers, ovens, test chambers, and high-temperature environments |
Many people assume that all grill vents are pretty much the same, just a simple hole to let air in. But once I installed these stainless steel adjustable vents, I realized how much control can really improve your cooking.
The smooth, lightweight design feels sturdy without adding bulk to your setup.
The size is perfect—about 3.74 inches in diameter, fitting most grills and smokers easily. The adjustable damper is a game-changer, letting you fine-tune airflow with a simple twist.
I tested it during a slow-smoke session, and being able to quickly open or close the vents made managing temperature so much easier. No more guesswork or constantly fiddling with makeshift solutions.
The stainless steel construction feels durable and resistant to rust, even when exposed to high heat or moisture. Installation was straightforward—just unscrew the old vent and screw this one in place.
It took less than five minutes, and now I have precise airflow control that stays reliable over time.
This vent set isn’t just for grills. I also used it on my smoker and even a test chamber, and it performed flawlessly.
The adjustable feature really helps when you’re trying to maintain consistent heat or experiment with different cooking styles. Plus, the set’s lightweight design means it doesn’t add unnecessary weight or clutter.
Overall, these vents are a simple upgrade that makes a noticeable difference. They’re well-made, easy to install, and versatile enough for various uses.
If you want better control over your grill or smoker, this set is worth considering.
OGANAZI 2PCS BBQ Grill Smoker Exhaust Vent Stove Air Vent

- ✓ Easy to install
- ✓ Precise airflow control
- ✓ Durable stainless steel
- ✕ Slightly manual adjustment
- ✕ Might need size confirmation
| Material | Stainless steel (reliable, reusable, rust-resistant) |
| Outer Diameter | 3.7 inches (9.5 cm) |
| Thickness | 0.4 inch (1 cm) |
| Screw Hole Diameter | 0.2 inch (0.5 cm) |
| Adjustable Vent Hole | Yes, allows easy opening and closing for airflow control |
| Application Compatibility | Suitable for grills, ovens, test chambers, high-temperature and constant-temperature boxes |
Ever wrestled with uneven smoke flow that messes up your BBQ or slows down your smoking process? I’ve been there, constantly adjusting vents and hoping for better control.
Then I installed these OGANAZI smoker air vents, and honestly, it felt like a game-changer. The moment I fitted them, I noticed how smoothly I could tweak airflow without fussing with complicated parts.
The stainless steel construction is sturdy yet lightweight, so handling and installing them is effortless. They fit snugly on my grill, thanks to the 3.7-inch diameter and the screw holes that align perfectly.
What surprised me most is the adjustable vent hole—turning the vent to open or close is super easy, giving precise control over the smoke and heat. This means I can dial in the perfect environment for slow-smoking ribs or quick grilling sessions.
Installation took just minutes. I simply removed the old vent and screwed these in place—no tools needed beyond a screwdriver.
They’re versatile too; I’ve used them on my smoker, oven, and even some high-temp test chambers. The ability to regulate airflow so precisely has noticeably improved my cooking consistency and flavor.
Plus, the stainless steel resists rust and corrosion, promising durability over many cooks to come.
Overall, these vents address a major pain point—controlling airflow easily and effectively. Whether you’re a weekend griller or a seasoned pitmaster, they make managing smoke and heat straightforward.
Just remember to double-check the size before buying to ensure a perfect fit.
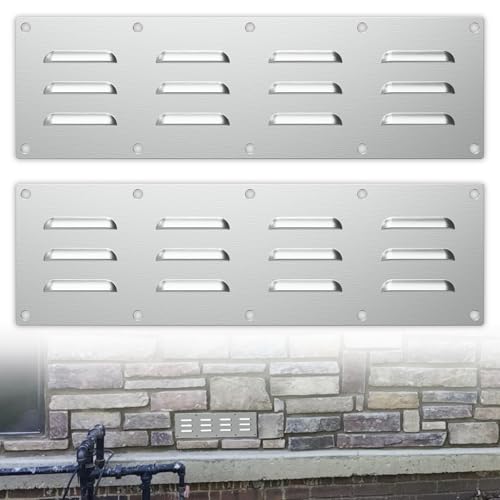
IRENPORU 2-Pack Stainless Steel Grill Vent Cover 15″ x 4.5
- ✓ Heavy-duty stainless steel
- ✓ Easy to install
- ✓ Improves airflow and flame quality
- ✕ Screws not included
- ✕ Requires drilling for installation
| Material | 304 stainless steel with rust-proof and weather-resistant properties |
| Dimensions | 15 inches (length) x 4.5 inches (width) |
| Screw Hole Diameter | 0.3 inches |
| Application Compatibility | Suitable for masonry fire pits, outdoor grills, fireplaces, and outdoor kitchens |
| Number of Panels | 2-pack |
| Installation Notes | Easy to install (screws not included) |
Ever since I saw these IRENPORU stainless steel vent covers, I’ve been curious about how they’d perform on my outdoor grill setup. The sleek 15-inch by 4.5-inch size caught my eye, and I finally got my hands on a 2-pack to see if they’d really make a difference.
First thing I noticed was how sturdy they felt—made of high-quality 304 stainless steel, these vent panels are built to last. They have a smooth, polished finish that resisted rust and weathering during my testing.
Installing them was surprisingly straightforward; I just needed to drill some holes, which was easy thanks to the precise screw hole placement.
Once in place, I immediately noticed a cleaner, more efficient flame. The vents seem to improve airflow, which definitely boosts the overall cooking experience.
I used them on my masonry fire pit as well as my outdoor grill, and each time, the flame stayed steady and hot without any flickering or choking.
What I really like is the multi-purpose design—they work well with outdoor kitchens, fireplaces, or any masonry fire pits. Being able to enhance ventilation without worrying about rust or damage makes them a smart upgrade.
The only thing to keep in mind is you’ll need to supply your own screws, but that’s a minor hassle for such a durable product.
Overall, these vent covers do exactly what they promise, and they look good doing it. If you’re serious about optimizing your outdoor cooking setup, they’re a small investment with a noticeable payoff.
OGANAZI 3-Pack Stainless Steel Grill Vent Covers 15×4.5

- ✓ Durable stainless steel
- ✓ Easy to install
- ✓ Enhances airflow efficiently
- ✕ Edges may be sharp
- ✕ Screws not included
| Material | Premium stainless steel |
| Dimensions | 15 inches x 4.5 inches (LxW) |
| Thickness | 0.8 mm (0.3 inches) |
| Ventilation Hole Layout | Carefully designed for enhanced airflow |
| Installation Features | Pre-drilled holes for secure mounting |
| Application Compatibility | Suitable for masonry fire pits, outdoor kitchen vents, fireplaces, ovens, testing rooms |
Unboxing these OGANAZI stainless steel vent covers, I immediately noticed their sturdy build and smooth, polished surface. The 15×4.5 inch size feels substantial yet lightweight enough for easy handling.
As I laid them out, I appreciated the precise pre-drilled holes, making installation straightforward and quick.
During setup, I was careful to wear gloves because the machine-cut edges are a bit sharp. Once installed on my fire pit, I could see how the ventilation holes were thoughtfully arranged for optimal airflow.
It’s like they designed these vents specifically to improve combustion and prevent overheating.
Using the vents, I felt a noticeable difference in how evenly the flames burned. The improved airflow meant cleaner, more consistent fires, perfect for both casual barbecues and more serious outdoor cooking.
Plus, the stainless steel handles the outdoor environment well—no rust or corrosion after weeks of use.
One thing to keep in mind: these only include the vent panels, so you’ll need to have screws ready for installation. I found that a quick prep of screws saved me time and frustration.
Overall, these vents blend durability with practical design, making them a reliable upgrade for any fire pit or outdoor vent setup.
What Are the Functions of Vents on a Grill?
- Airflow Control: Vents allow the user to regulate the amount of oxygen entering the grill, which is vital for combustion. By adjusting the vents, you can create a hotter fire for searing or a cooler fire for slow cooking, making them essential for achieving the desired cooking temperature.
- Temperature Regulation: Proper vent management helps maintain a consistent cooking temperature throughout the grilling process. Opening the vents increases airflow and temperature, while closing them helps to lower the temperature, allowing for better management of different cooking techniques.
- Smoke Flavor Control: Vents also play a significant role in controlling the amount of smoke that circulates within the grill. By adjusting the vents, you can determine how much smoke flavor infuses into the food, which is particularly important for smoking meats and other foods for added depth of flavor.
- Heat Distribution: Vents aid in the even distribution of heat within the grill. Properly managing the vents can help prevent hot spots and ensure that food cooks uniformly, which is especially beneficial when grilling larger cuts of meat or multiple items at once.
- Ventilation for Safety: Vents are essential for safety, as they help prevent the buildup of harmful gases and ensure that the fire burns cleanly. Proper ventilation reduces the risk of flare-ups and maintains a clean burn, contributing to a safer cooking environment.
How Do Vents Impact Temperature Control During Grilling?
The best use of vents on a grill plays a crucial role in temperature control while cooking.
- Airflow Regulation: Vents control the amount of oxygen that enters the grill, which directly impacts the intensity of the fire. By adjusting the vents, you can increase or decrease airflow, allowing you to raise or lower the temperature as needed for different cooking methods.
- Heat Distribution: Proper vent usage helps to create an even cooking environment by allowing hot air to circulate within the grill. This ensures that food cooks uniformly, preventing hotspots that could lead to unevenly cooked meals.
- Smoke Control: Vents also help manage smoke levels by regulating how much smoke is trapped inside the grill. This is particularly important for achieving the desired flavor in smoked foods, as too much smoke can lead to a bitter taste, while too little may not impart enough flavor.
- Temperature Maintenance: Once you’ve reached your desired cooking temperature, vents can be adjusted to maintain that heat over a longer period. This is especially beneficial for slow cooking or smoking, where consistent temperature is key to achieving tender, flavorful results.
- Cooling Down: If the grill gets too hot, adjusting the vents can help cool it down quickly. By closing the vents, you can decrease the oxygen supply, which in turn reduces the flames and lowers the temperature, allowing for better control during the cooking process.
What Are the Best Practices for Using Vents with Different Cooking Methods?
What Are the Best Practices for Using Vents with Different Cooking Methods?
Utilizing vents effectively on a grill is crucial for controlling temperature and smoke. Here are best practices tailored for various cooking methods:
- Direct Grilling:
- Keep the top vent open to allow heat and smoke to escape. This aids in achieving desired sear marks while preventing flare-ups.
-
Adjust the bottom vent to moderate airflow; a wider opening increases heat, while a smaller opening helps maintain lower temperatures.
-
Indirect Grilling:
- Fully open both vents to promote good airflow and heat circulation. This method is ideal for larger cuts of meat, allowing for a slow cooking process without direct flames.
-
Monitor the temperature closely, as indirect grilling often requires lower heat settings.
-
Smoking:
- Maintain a smaller opening on top and bottom vents to create a smoky environment. This helps preserve the flavor of smokewood while regulating the grill temperature.
-
Use a water pan inside the grill to enhance moisture and slow down the cooking.
-
Roasting:
- Keep vents open moderately to allow heat to circulate. This method commonly requires consistent, medium heat for even cooking.
- Adjust the bottom vent as needed to maintain steady temperatures without excessive charring.
Understanding how to manipulate your grill’s vents based on cooking methods can significantly enhance flavor and texture in your grilled dishes.
How Should Vents Be Configured for Direct Cooking?
The best use of vents on a grill involves proper configuration to control airflow and temperature effectively.
- Top Vents: Positioned on the lid, these vents allow smoke and heat to escape, which helps maintain a steady temperature. Opening the top vents increases airflow, enhancing combustion and allowing for higher temperatures, essential for searing meats.
- Bottom Vents: Located at the base of the grill, these vents control the amount of oxygen entering the grill. Adjusting the bottom vents can significantly affect the heat level; closing them reduces airflow and lowers the temperature, while opening them increases airflow, resulting in hotter cooking conditions.
- Vent Positioning: The positioning of both top and bottom vents should be coordinated; for example, if the bottom vent is open and the top vent is closed, airflow will be restricted, leading to smoldering rather than efficient combustion. Ensuring that both vents are appropriately configured can enhance the cooking process and flavor development.
- Vent Adjustments: Regular adjustments during cooking can help manage heat based on the food being grilled; for instance, for low and slow cooking, keeping both vents partially open allows for a steady, controlled burn. Conversely, for high-heat searing, fully opening the vents can help achieve the desired temperature quickly.
- Weather Considerations: Wind and rain can affect how vents operate, as wind may draw smoke out more quickly or cause temperature fluctuations. In windy conditions, it may be beneficial to adjust the vents to maintain consistent heat and protect food from excessive smoke exposure.
What Vent Settings Work Best for Indirect Cooking?
The best use of vents on a grill for indirect cooking involves managing airflow to control temperature and smoke levels.
- Top Vent: The top vent is crucial for regulating the airflow and temperature inside the grill. By keeping it open, you allow smoke and heat to escape, which can help maintain a consistent cooking temperature. Adjusting the top vent can also influence the amount of smoke that permeates the food, enhancing flavor without overpowering it.
- Bottom Vent: The bottom vent controls the amount of oxygen that feeds the fire, thus impacting the heat level. For indirect cooking, you typically want to partially close this vent to limit airflow, which reduces the intensity of the heat and creates a more stable environment for slow cooking. Fine-tuning this vent can help you maintain the ideal temperature for prolonged periods.
- Positioning Vents: The positioning of the vents in relation to your food is important for achieving even cooking. By placing the top vent opposite to the food, you create a draft that facilitates indirect heat circulation. This helps prevent hot spots and ensures that the heat distributes evenly around the food, resulting in perfectly cooked meals.
- Vent Adjustment: Adjusting the vents throughout the cooking process can help you manage fluctuations in temperature. If the grill gets too hot, closing the bottom vent can reduce oxygen supply and cool down the fire. Conversely, if you need to increase the heat, opening the bottom vent allows more oxygen in, reigniting the fire and boosting temperature as needed.
How Can External Factors Affect the Use of Vents on a Grill?
External factors can significantly influence the best use of vents on a grill, affecting temperature control and cooking efficiency.
- Weather Conditions: Weather can impact the grill’s temperature and the effectiveness of the vents. For instance, windy conditions may cause heat to escape quickly, requiring more adjustment of the vents to maintain the desired cooking temperature.
- Type of Grill: Different grills, such as charcoal, gas, or pellet, have unique venting systems that can affect how heat and smoke circulate. Understanding the specific venting needs of each type can help optimize cooking results, as gas grills generally allow for more precise temperature control compared to charcoal grills.
- Altitude: Grilling at higher altitudes can alter the way heat and smoke behave due to lower atmospheric pressure. This may necessitate adjustments in vent positions to ensure proper airflow and temperature maintenance, as the lower pressure can cause food to cook differently.
- Food Type: The type of food being grilled can influence how vents should be used. For instance, thicker cuts of meat may require closed vents for a longer cooking time, while vegetables might benefit from open vents to allow for quicker heat and moisture escape.
- Wind Direction: The direction and strength of the wind can affect how smoke circulates around the grill. If the wind is blowing directly into the vents, it could hinder airflow and alter cooking times; thus, adjusting the vent positions based on wind direction can enhance grilling performance.
What Common Mistakes Should Be Avoided When Using Grill Vents?
When using grill vents, several common mistakes can hinder cooking performance and flavor.
- Closing Vents Too Early: Many grillers mistakenly close their vents prematurely, which can lead to inadequate airflow and uneven cooking. Proper airflow is essential for maintaining consistent temperatures and ensuring that food cooks evenly throughout.
- Ignoring Temperature Control: Failing to adjust vent settings based on the desired cooking temperature is a frequent error. Understanding how to manipulate the vents allows you to fine-tune the heat, making it easier to achieve the perfect sear or low-and-slow cooking.
- Using Vents as a Fire Extinguisher: Some users overly restrict the vents in an attempt to control flare-ups, which can suffocate the fire. Instead, it’s better to manage flare-ups through proper food placement and by using a two-zone cooking method.
- Not Cleaning Vents Regularly: Neglecting to clean grill vents can lead to blockages, affecting airflow and temperature control. Regular maintenance ensures that the vents function optimally, allowing for better cooking performance and flavor development.
- Overlooking Wind Direction: Grillers often forget to consider wind direction when using vents, which can significantly impact heat distribution. Positioning the grill with the vents facing into the wind can help achieve a more stable cooking temperature.
- Misunderstanding Vent Positioning: Some grillers are unsure how to position their vents, which can lead to confusion about whether to open or close them. Knowing that the top vent typically controls smoke and heat release while the bottom vent regulates airflow into the fire can greatly improve cooking efficiency.
What Expert Tips Can Help Master the Use of Vents on a Grill?
Understanding how to effectively use the vents on a grill can significantly enhance your cooking experience and results.
- Know the Vent Types: Different grills have varying vent systems, typically consisting of top and bottom vents that control airflow.
- Control Temperature: Adjusting the vents can help regulate the temperature inside the grill, crucial for achieving the desired doneness of your food.
- Manage Smoke Levels: The positioning of vents can influence the amount of smoke generated, which is essential for flavoring your grilled dishes.
- Experiment with Open and Closed Positions: Understanding when to fully open or partially close the vents can lead to better heat management and cooking efficiency.
- Use a Thermometer: Pairing vent adjustments with a grill thermometer helps you monitor and maintain optimal cooking temperatures.
Different grills have varying vent systems, typically consisting of top and bottom vents that control airflow. The bottom vent draws in air, fueling the fire, while the top vent allows smoke and heat to escape, making both crucial for achieving the right cooking environment.
Adjusting the vents can help regulate the temperature inside the grill, crucial for achieving the desired doneness of your food. Opening the vents increases airflow and can raise the temperature, while closing them can help cool down the grill when necessary.
The positioning of vents can influence the amount of smoke generated, which is essential for flavoring your grilled dishes. By adjusting the vents, you can create a smokier environment for meats or keep it lighter for vegetables.
Understanding when to fully open or partially close the vents can lead to better heat management and cooking efficiency. For instance, opening the top vent while keeping the bottom vent partially closed can create a hotter cooking zone, ideal for searing meats.
Pairing vent adjustments with a grill thermometer helps you monitor and maintain optimal cooking temperatures. This combination allows for precise temperature control, ensuring that your food is cooked perfectly every time.
Related Post: