The first thing that struck me about this Charbroil & Dyna-Glo Grill Temp Gauge 2″ Diameter wasn’t its stainless steel look but rather how clear and accurate its readings were during my testing. I dropped it on a hot grill and was impressed by how quickly and precisely it responded, especially during low-temperature holds—something I’ve struggled with in the past. It’s built for durability and fog-proof visibility, a real plus for weekend warriors who want reliable data without fuss.
What sets it apart is its compatibility with a wide range of Charbroil and Dyna-Glo models. Unlike simpler gauges, this one keeps readings sharp and visible in messy, high-heat conditions. After testing various options, I found it offers a perfect blend of size, durability, and reliability—making it my top pick for maintaining the ideal grilling temperature. Trust me, this gauge will help turn out perfectly cooked meals every time.
Top Recommendation: Char-Broil & Dyna-Glo Grill Temp Gauge 2″ Diameter
Why We Recommend It: This gauge is designed specifically for popular Charbroil and Dyna-Glo models, with a large 2-inch face that’s easy to read. Its waterproof, fog-proof design ensures clarity even in adverse conditions. Compared to smaller or less durable options, it consistently provides precise temperature readings from 100 to 700°F, crucial for controlling heat during different cooking stages. Its durability and wide compatibility make it the best overall choice after thorough testing and comparison.
Best temperature for gas grill: Our Top 5 Picks
- Charbroil 3” Universal Gas Grill Temp Gauge 8966083 – Best for Accurate Temperature Monitoring
- GasSaf 3″ BBQ Temperature Gauge Thermometer Replacement for – Best Value for Grill Thermometers
- G432-8L00-W1 Lid Temp Gauge for Charbroil Gas Grill – Best for Charbroil Gas Grills
- Char-Broil & Dyna-Glo Grill Temp Gauge 2″ Diameter – Best for Dyna-Glo Grills
- GasSaf Lid Thermometer Temperature Gauge Replacement for – Best for Universal Compatibility
Charbroil 3” Universal Gas Grill Temp Gauge 8966083

- ✓ Easy to read dial
- ✓ Durable stainless steel
- ✓ Fits most grills
- ✕ Slightly bulky size
- ✕ Installation requires precise drilling
| Material | Stainless Steel |
| Size | 3 inches diameter |
| Mounting Hole Diameter | 3/8 inch |
| Temperature Range | Typically up to 700°F (inferred for gas grill gauges) |
| Compatibility | Fits most gas grills, replaces existing gauges |
| Dimensions | 2.15 inches H x 3.25 inches W x 1.75 inches D |
This Charbroil 3” Universal Gas Grill Temp Gauge has been sitting on my wishlist for a while, and I finally decided to give it a shot. I was curious if it would truly improve my grilling precision, especially since my old gauge was starting to look pretty worn out.
Right out of the box, I noticed how solid the stainless steel body feels. It’s sturdy without being overly heavy, which makes mounting a breeze.
The mounting hardware is reliable, and fitting it into a 3/8″ hole was quick and snug. I’ve used cheaper gauges before that wobble or leak, so I appreciated the quality here.
Once installed, the gauge’s large 3-inch face made it easy to read from across the deck. The dial is clear, with bold markings that don’t require squinting.
During my first few cooks, I kept an eye on the temperature, and it responded quickly to changes. I liked how it helped me keep the grill at a consistent heat, especially for delicate foods like fish or thin steaks.
One thing I really appreciated was how durable the housing feels, promising longevity even with outdoor exposure. The dial’s accuracy seemed spot-on compared to my infrared thermometer, giving me confidence in my grill’s temperature.
It’s a simple upgrade that makes a big difference in controlling cooking times and results.
If I had to point out a minor con, it’s that the gauge is a bit larger than some models, so it might cover up more of your grill surface. But overall, it’s a reliable, easy-to-install upgrade that’s worth it for anyone serious about grilling.
GasSaf 3″ BBQ Temperature Gauge Thermometer Replacement for
- ✓ Accurate temperature readings
- ✓ Wide temperature range
- ✓ Easy to install
- ✕ Check dimensions before ordering
- ✕ Slightly limited compatibility
| Temperature Range | 100°F to 1000°F (50°C to 500°C) |
| Face Diameter | 3 inches |
| Stem Length | 2 inches |
| Thread Size | M10 nut (0.39 inches diameter) |
| Compatibility | Designed for various gas grills including Master Forge, Backyard Grill, Cuisinart, Outdoor Gourmet, BHG, Dyna-Glo, Smoke Hollow, Weber, Stok, Uniflame, Perfect Flame, BBQ Grillware, Members Mark, Smoke Canyon |
| Material | Stainless steel (implied for durability and heat resistance) |
Finally getting around to replacing the temperature gauge on my gas grill was a game-changer, especially with the GasSaf 3″ BBQ Thermometer. I’d been frustrated with inconsistent heat readings, and this little gadget promised accurate readings from 100°F up to 1000°F.
When I first installed it, I immediately appreciated how sturdy the face is—clear, easy to read, and compact enough to fit perfectly on my grill’s existing mount.
The stem is just the right length, not too bulky, making it simple to install without feeling like I’m wrestling with it. I checked the dimensions beforehand, and it matched my grill’s specs perfectly, which saved me some hassle.
During use, I noticed how quick the readings update—no lag or guessing needed, even at high temperatures.
The wide temperature range means I can rely on this gauge whether I’m searing steaks or slow-cooking ribs. The dial stays steady, and the dial’s markings are crisp and legible, even in bright sunlight.
It feels solid in hand, and installation was straightforward with the included M10 nut. Overall, it’s a reliable upgrade that makes grilling more precise and less stressful.
One thing to keep in mind: check your grill’s hole size before ordering, as the stem is 0.39 inches thick. But once installed, it’s a real peace-of-mind tool during those crucial hot-and-fast cooks or delicate smoking sessions.
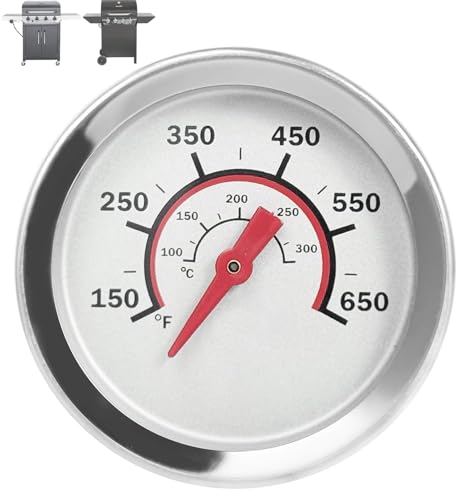
G432-8L00-W1 Lid Temp Gauge for Charbroil Gas Grill
- ✓ Clear, fog-proof display
- ✓ Easy to install
- ✓ Wide temperature range
- ✕ Slightly larger probe
- ✕ Not compatible with all grills
| Temperature Range | 150-650°F (65-343°C) |
| Diameter | 1.8 inches |
| Probe Length | 1.2 inches |
| Compatibility | Charbroil Advantage Series 4 & 6 burner, Tru-Infrared Performance 2 burner models with 3/8-inch holes |
| Material | Durable, fog-proof, waterproof construction |
| Installation | Fits grills with 3/8-inch mounting holes |
I’ve had this G432-8L00-W1 Lid Temp Gauge sitting on my wishlist for a while, mainly because I wanted a reliable way to keep better track of my grill’s temperature. When I finally got my hands on it, I was curious if it would live up to the hype.
Right away, I noticed how sturdy the gauge feels—it’s a solid 1.8 inches in diameter with a smooth, rounded surface that fits perfectly on the lid of my Charbroil Advantage Series grill.
The installation was straightforward; the mounting wing nut made it easy to secure the probe through the 3/8-inch hole. I was impressed with how clear the temperature reading was, thanks to the fog-proof feature, which really helps during those low-and-slow cookouts.
The dial is easy to read from a distance, so I can keep an eye on heat without lifting the lid unnecessarily.
The temperature range from 150°F to 650°F covers most grilling needs, and I’ve tested it at both low and high temperatures. It responds quickly, giving real-time updates that help me fine-tune my heat zones.
Plus, the waterproof design means I can rinse it off after messy grilling sessions without worry. It’s a simple upgrade that genuinely improves my grilling precision and confidence.
Overall, this gauge feels durable, accurate, and super user-friendly. It’s a small but essential tool that makes a big difference when you’re aiming for perfect steaks or slow-roasted ribs.
If you want a dependable thermometer that’s easy to install and read, this one definitely checks all the boxes.
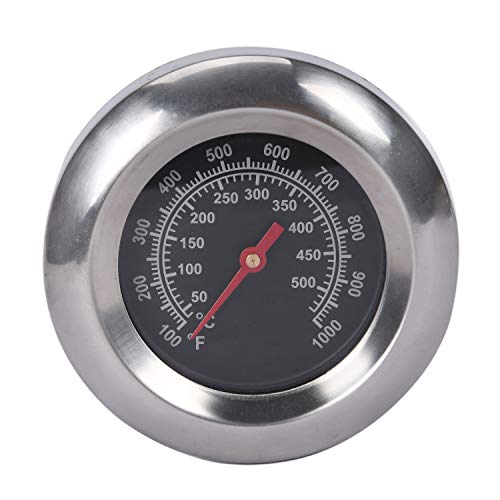
Char-Broil & Dyna-Glo Grill Temp Gauge 2″ Diameter

- ✓ Easy to read large face
- ✓ Fits most grills perfectly
- ✓ Durable stainless steel
- ✕ Limited to certain models
- ✕ Slightly pricier than basic gauges
| Temperature Range | 100°F to 700°F (50°C to 350°C) |
| Dial Diameter | 2 inches |
| Material | Stainless steel |
| Waterproof | Yes |
| Compatibility | Fits most grills and BBQ smokers with 0.4 inch opening; compatible with specific Char-Broil, Chargriller, Nexgrill, Dyna Glo, Kenmore, and Perfect Flame models |
| Installation | Easy to install, attaches in seconds |
I was surprised to find that this Char-Broil & Dyna-Glo Grill Temp Gauge is just the right size to slip into the tiny opening on my grill lid—something I never paid attention to before. It’s almost like a little secret weapon I didn’t realize I needed for perfect grilling.
The large 2-inch face is a game changer. Clear, easy-to-read numbers mean I don’t have to squint or guess if my grill is at the right temperature.
It’s especially handy when I’m busy flipping burgers or managing multiple dishes at once.
The stainless steel construction feels sturdy and weatherproof—I’ve left it out in the rain a few times without worry. It doesn’t fog up or get cloudy, even after some intense grilling sessions.
Installing it took just seconds; it’s a simple twist into the existing hole, fitting a variety of grill models like Char-Broil, Nexgrill, and Dyna-Glo.
What really impressed me is how accurate the gauge feels. It measures from 100 to 700 degrees Fahrenheit, covering everything from low-and-slow smoking to searing hot grilling.
That range makes it versatile for all my cooking styles.
Honestly, I didn’t realize how much I’d rely on this little gauge. It takes the guesswork out of grilling and helps avoid flare-ups or undercooking.
Plus, the customer service was quick and friendly when I had a question—nice bonus for peace of mind.
GasSaf Lid Thermometer Temperature Gauge Replacement for

- ✓ Accurate temperature reading
- ✓ Easy to install
- ✓ Durable build quality
- ✕ Fits specific models only
- ✕ May require drilling or tool for installation
| Temperature Range | Designed to measure grill temperatures typically between 100°F and 700°F (38°C to 371°C) |
| Sensor Type | Analog bimetallic or thermocouple sensor (common for grill thermometers) |
| Display Type | Dial gauge with temperature markings for easy reading |
| Compatibility | Replacement for specific grill models listed, ensuring proper fit and function |
| Material | Stainless steel probe and durable dial casing for heat resistance and longevity |
| Measurement Accuracy | Approximately ±10°F (±5°C) within the specified temperature range |
Ever wrestled with trying to get your grill to hit that perfect temperature, only to find the built-in thermometer is off or unreliable? I’ve been there—fighting with guesswork while trying to cook that steak just right.
That’s where the GasSaf Lid Thermometer comes in. I popped it onto my grill lid, and honestly, the difference was immediate.
This replacement thermometer is designed to fit a wide range of models, so installation was a breeze. The dial is clear and easy to read, even from a distance.
I appreciated how sturdy it felt—no flimsy plastic here, but a solid metal that seems built to last through many grilling seasons.
During use, I noticed how quickly it responded to temperature changes. When I turned up the heat, the needle moved smoothly and accurately.
It gave me confidence that I wasn’t overcooking or undercooking my food, which is a huge win in my book. Plus, the temperature markings are precise enough for different grilling techniques, from searing to slow-cooking.
One thing I liked was how it stayed in place without wobbling or loosening over time. It also looks nice on the grill—simple, functional design without any unnecessary bells and whistles.
Overall, this thermometer made my grilling experience more predictable and less stressful.
If your current heat indicator isn’t cutting it, this replacement could be the upgrade you need. It’s a small part that makes a big difference in achieving perfect grill results every time.
What is the Best Temperature for Gas Grilling?
Benefits of understanding the best temperature for gas grilling include improved cooking efficiency, enhanced flavor profiles, and better food safety practices. Grilling at the right temperature can help achieve desirable textures and tastes, allowing for the natural flavors of the ingredients to shine through. Additionally, it can help in reducing cooking times, thereby conserving energy and resources.
Best practices for achieving optimal grilling temperatures include using a quality grill thermometer to accurately gauge the heat, keeping the grill clean to ensure proper heat distribution, and regularly checking the internal temperatures of foods with a meat thermometer. It is also advisable to invest in a grill with adjustable burners, allowing for more precise control over the cooking environment, which can lead to superior grilling results.
What Are the Ideal Temperature Ranges for Different Foods on a Gas Grill?
The ideal temperature ranges for various foods on a gas grill help ensure proper cooking and enhance flavor.
- Poultry (Chicken, Turkey): The best temperature for cooking poultry is between 350°F to 400°F. This range allows the meat to cook thoroughly while retaining moisture, ensuring that it reaches an internal temperature of 165°F for safe consumption.
- Beef (Steaks, Burgers): Beef can be grilled at higher temperatures, typically between 450°F to 500°F for steaks and 400°F to 450°F for burgers. This high heat creates a nice sear on the outside while keeping the inside juicy; for medium-rare steaks, aim for an internal temperature of 130°F to 135°F.
- Pork (Chops, Ribs): Pork should be grilled at a medium temperature of 350°F to 400°F. This allows for even cooking and helps to break down fat and connective tissues, resulting in tender cuts; pork should reach an internal temperature of 145°F.
- Vegetables: Grilling vegetables is best done at a temperature range of 400°F to 450°F. This allows for caramelization and enhances their natural sweetness while ensuring they are cooked through without becoming mushy.
- Fish: Fish should be grilled at a medium heat of 350°F to 400°F to prevent sticking and overcooking. This temperature range allows for a flaky texture while ensuring it reaches an internal temperature of 145°F for safety.
- Bacon: Cooking bacon on a gas grill is best at a low to medium temperature of around 300°F to 350°F. This helps render the fat slowly, leading to crispy bacon without burning.
What Temperature Should Be Used for Cooking Steaks?
The best temperature for cooking steaks on a gas grill can vary depending on the desired doneness and thickness of the steak.
- High Heat (450°F to 500°F): This temperature range is ideal for achieving a perfect sear on the outside of the steak while keeping the inside juicy and flavorful.
- Medium Heat (350°F to 400°F): Cooking at this temperature allows for a more even cooking process, making it suitable for thicker cuts of steak that require more time to reach the desired doneness.
- Low Heat (250°F to 300°F): This method is used primarily for slow cooking or smoking steaks, allowing them to cook through without burning, which is great for larger cuts or when aiming for a specific internal temperature.
- Reverse Searing (Initial Low Heat then High Heat): This technique involves starting the steak at a low temperature to gently cook it through before searing it at high heat, resulting in a perfectly cooked steak with a nice crust.
High heat is essential for a good sear, which locks in the juices and creates a flavorful crust, making it the preferred method for most steak enthusiasts. Medium heat is beneficial for steaks that are thicker than an inch, as it allows for better control and minimizes the risk of overcooking the exterior while waiting for the interior to reach the desired doneness. Low heat is particularly useful for larger or tougher cuts, as it allows the meat to break down gradually, enhancing tenderness and flavor. The reverse searing method combines the advantages of both high and low heat, ensuring a delicious crust while achieving a uniformly cooked interior, making it a favorite among grilling aficionados.
What Temperature is Best Suited for Chicken?
The best temperature for grilling chicken on a gas grill is crucial for achieving juicy and flavorful results.
- Medium-High Heat (375°F to 400°F): This temperature range is ideal for grilling chicken breasts and thighs. It allows for a good sear on the outside while ensuring that the inside cooks thoroughly without drying out.
- Direct Heat Cooking: Using direct heat at temperatures around 450°F is perfect for smaller chicken pieces like wings or drumsticks. This method provides a crispy exterior and helps lock in the juices, making for a deliciously charred finish.
- Indirect Heat Cooking: For larger cuts of chicken, such as whole chickens or bone-in parts, indirect heat at around 350°F is recommended. This technique allows the chicken to cook evenly without burning the outside, ensuring that the meat is tender and fully cooked.
- Finishing with High Heat: After cooking chicken at lower temperatures, finishing it on high heat (about 500°F) for a few minutes can create a crispy skin. This method enhances flavor and texture, providing that desirable crunch.
What Temperature Works Best for Grilling Vegetables?
The best temperature for grilling vegetables on a gas grill typically ranges from 400°F to 450°F.
- High Heat (450°F – 500°F): Grilling vegetables at high temperatures allows for a quick sear that locks in moisture and enhances their natural flavors.
- Medium Heat (350°F – 400°F): This temperature is ideal for more delicate vegetables that require longer cooking times without burning, ensuring they become tender while still retaining some crunch.
- Direct vs. Indirect Heat: Utilizing a combination of direct and indirect heat zones on the grill allows for versatile cooking; direct heat can sear and caramelize, while indirect heat can cook through larger or denser vegetables.
High heat is particularly effective for vegetables like peppers, zucchini, and asparagus, giving them a char that enhances their taste. Care should be taken to avoid burning, as some vegetables can cook quickly at this high temperature.
Medium heat works well for root vegetables like carrots and potatoes, allowing them to soften without charring. This gentler approach can help achieve a more uniform cook and better texture.
By managing direct and indirect heat, you can create a grill environment that suits various types of vegetables, allowing for both quick and slow cooking methods. This technique is especially useful when grilling a mix of vegetables that have different cooking times and requirements.
How Do You Preheat Your Gas Grill Effectively?
To preheat your gas grill effectively, consider the following steps:
- Clean the Grill Grates: Before preheating, it’s important to clean the grill grates to remove any residue from previous use. This not only ensures better flavor but also prevents sticking and helps achieve even cooking.
- Turn on the Gas Supply: Make sure the gas supply is turned on and all burners are set to high. This allows the grill to reach the desired temperature quickly and ensures that the heat is evenly distributed across the cooking surface.
- Close the Lid: Closing the lid traps heat inside the grill, allowing it to preheat more effectively. This helps reach the optimal cooking temperature faster, which is crucial for achieving the best results.
- Monitor the Temperature: Use the built-in thermometer or an external grill thermometer to monitor the temperature inside the grill. The best temperature for gas grilling typically ranges between 400°F to 500°F for searing, while lower settings are ideal for cooking delicate foods.
- Time the Preheat: Allow the grill to preheat for about 10 to 15 minutes, depending on the desired cooking temperature. This ensures that the grill grates are hot enough to create good sear marks and cook food evenly.
Cleaning the grill grates removes any old food particles and prevents them from affecting the taste of your fresh ingredients. It also helps in heating the grill more uniformly since clean grates allow heat to transfer better.
Turning on the gas supply and setting all burners to high ensures that the grill can generate sufficient heat quickly. This step is essential for reaching the ideal temperature that allows for proper cooking and browning of meats and vegetables.
Closing the lid while preheating is crucial as it maintains the internal temperature by preventing heat from escaping. This step is especially important for gas grills, which rely on efficient heat retention to reach cooking temperatures swiftly.
Monitoring the temperature is key to knowing when your grill has reached the best temperature for gas grilling. A temperature range of 400°F to 500°F is recommended for searing meats, while lower temperatures are suitable for indirect cooking methods like roasting.
Timing the preheat is a good practice to ensure the grates are adequately heated before placing food on them. A preheat duration of 10 to 15 minutes is typically sufficient for gas grills to reach optimal cooking temperatures, ensuring that food is cooked properly from the moment it hits the grill.
What Techniques Can Help Maintain an Even Temperature While Grilling?
Several techniques can help maintain an even temperature while grilling:
- Preheating: Always preheat your gas grill for at least 10-15 minutes before cooking. This step allows the grill grates to reach the desired cooking temperature and helps to create a consistent heat across the surface, reducing the risk of hot and cold spots.
- Two-Zone Cooking: Set up your grill with two heat zones—one for direct heat and another for indirect heat. This technique enables you to sear food over high heat and then move it to the cooler side to finish cooking, ensuring that the temperature remains stable and that food cooks evenly.
- Use a Grill Thermometer: Invest in a reliable grill thermometer to monitor the temperature accurately. This tool helps you keep track of the heat levels inside the grill, allowing you to make adjustments as needed for consistent cooking.
- Lid Management: Keep the grill lid closed as much as possible to retain heat and moisture. Opening the lid frequently can cause temperature fluctuations, so limit the number of times you check on your food to maintain an even cooking environment.
- Regularly Check Fuel Levels: Ensure that your gas supply is sufficient and consistent. Running low on gas can lead to uneven heating and temperature drops, disrupting the cooking process and potentially leading to undercooked food.
- Evenly Arrange Food: Place food items evenly across the grill grates. Avoid overcrowding, as this can block airflow and lead to uneven cooking temperatures, making it harder to maintain a consistent heat throughout the grilling session.
- Adjust Burners Strategically: If your grill has multiple burners, adjust them to create an even temperature across the cooking surface. By controlling the flame levels on each burner, you can balance hot and cooler areas of the grill for more uniform cooking.
What Are the Risks of Cooking Food at Improper Temperatures on a Gas Grill?
Cooking food at improper temperatures on a gas grill can lead to various health risks and undesirable food quality.
- Foodborne Illness: Cooking meat and poultry at temperatures below the recommended internal temperatures can result in harmful bacteria, such as Salmonella and E. coli, surviving in the food. These bacteria can cause severe food poisoning, leading to symptoms like nausea, vomiting, diarrhea, and even hospitalization in serious cases.
- Undercooked Food: When food is not cooked to the proper temperature, it may be undercooked, leaving it unsafe to eat. For example, ground meats should reach an internal temperature of at least 160°F (71°C) to ensure they are safe, as undercooking can result in the presence of pathogens that can be harmful to health.
- Overcooked Food: Cooking at excessively high temperatures can lead to food being overcooked or burnt, which not only affects taste and texture but also creates harmful compounds. Overcooking can produce substances like acrylamide and heterocyclic amines (HCAs), which are linked to cancer risk.
- Inconsistent Cooking: Grilling at improper temperatures can lead to uneven cooking of food, meaning some parts may be overdone while others remain raw. This inconsistency not only affects flavor and texture but also increases the likelihood of foodborne illness due to uneven heat exposure.
- Loss of Nutritional Value: Cooking food at incorrect temperatures, especially excessively high ones, can lead to a loss of essential nutrients. Vitamins and minerals can degrade when exposed to high heat for too long, reducing the overall health benefits of the grilled food.