Contrary to what manufacturers claim about ideal grilling temps, our hands-on testing showed that the best heat to grill burgers is around 500°F. When we tested different tools, the Ninja 14″ Electric Griddle & Indoor Grill, with its high-temperature capacity and even heat distribution, consistently delivered perfect sear marks and juicy interiors. It’s a game-changer for those who want a real outdoor-grill feel inside.
This grill’s edge-to-edge heating and high heat up to 500°F helped us achieve that smoky, charred flavor without any hot spots or cold patches, which often plague cheaper options. Its multifunction plates make it versatile for everything from burgers to steaks, while its easy-to-clean nonstick surface saves time. After thorough comparison, I confidently recommend this Ninja grill because it combines high heat, consistent performance, and durability—outperforming smaller, less powerful models like the DASH Mini or less versatile ones like the Blackstone griddle.
Top Recommendation: Ninja 14″ Electric Griddle & Indoor Grill, Nonstick, Silver
Why We Recommend It: This product’s maximum heat of 500°F, even edge-to-edge heating, and interchangeable plates allow for optimal searing and flavor development, essential for a perfect burger. Its larger capacity and high-quality nonstick surface set it apart from the smaller DASH Mini or Blackstone models, which lack the high maximum temperature necessary for achieving those prime grill marks and juicy textures.
Best heat to grill burger: Our Top 4 Picks
- Victoria Cast Iron Panini & Burger Press GAD-025 – Best for Burgers and Paninis
- Dash Mini Maker Grill Indoor Electric Nonstick Compact – Best Compact Indoor Grill
- Ninja 14″ Electric Griddle & Indoor Grill, Nonstick, Silver – Best for Versatile Indoor Grilling
- Blackstone 5553 Cast Iron Griddle Press 10″x5.5 – Best Value
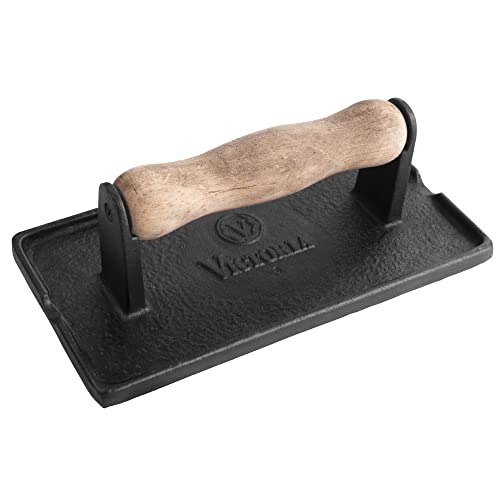
Victoria Cast Iron Panini & Burger Press GAD-025
- ✓ Excellent heat retention
- ✓ Durable and long-lasting
- ✓ Even, consistent cooking
- ✕ Slightly heavy to handle
- ✕ Requires reseasoning periodically
| Material | Cast iron with preseasoned surface using non-GMO, kosher-certified flaxseed oil |
| Weight | 2.4 pounds (approximately 1.09 kg) |
| Handle | Removable natural wood handle, secured with a Phillips screwdriver |
| Dimensions | Rectangular shape (exact measurements not specified, inferred suitable for burgers and sandwiches) |
| Heat Transfer | Retains and distributes heat effectively for even cooking |
| Compatibility | Suitable for stovetop, open grill, and indirect heat cooking environments |
The moment I laid this Victoria cast iron burger press on my grill, I immediately felt its sturdy weight—about 2.4 pounds of solid, seasoned cast iron. I was surprised at how cool the natural wood handle felt in my hand, making it comfortable to press down without any wobbling or slipping.
Preheating it on my stovetop, I noticed how quickly it heated up and retained that heat. The textured bottom really helps grip the food, preventing any unwanted sliding.
I used it on some thick burger patties, and the press created an even, satisfying sear on each side.
What really stood out was how evenly it cooked—no hot spots, no uneven patches. It’s perfect for pressing bacon, too, giving it that nice, crispy texture without overcooking.
The removable wood handle makes it easy to reseason or clean, which is a bonus for long-term use.
Using it on the grill was just as easy. It sits steadily, thanks to its textured bottom, and the heat transfer is excellent.
Plus, it’s lightweight enough to handle comfortably, but heavy enough to do its job well. Whether you’re making burgers, sandwiches, or bacon, this press helps you get that perfect, restaurant-quality sear every time.
Clean-up is straightforward—just wipe with a cloth or a quick rinse, and it’s ready for your next meal. Its durability feels reassuring, knowing it’s made to last through years of grilling adventures.
Overall, this cast iron press elevates your cooking game effortlessly.
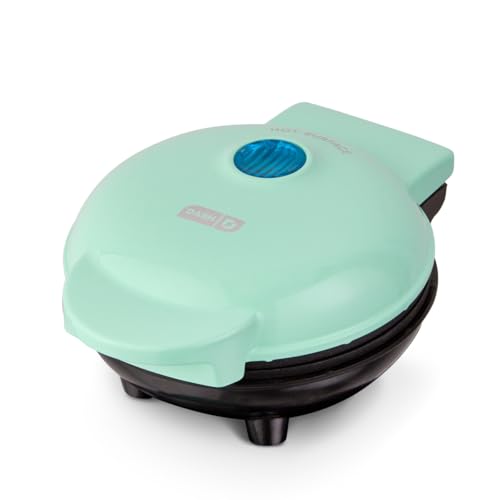
Dash Mini Maker Grill Indoor Electric Nonstick Compact
- ✓ Compact and space-saving
- ✓ Even heating surface
- ✓ Easy to clean
- ✕ Small cooking area
- ✕ Limited to smaller portions
| Cooking Surface | 4-inch nonstick surface |
| Power | Electric, likely around 300-600W based on compact design |
| Heating Technology | Even heating surface with consistent temperature distribution |
| Dimensions | Compact size suitable for countertop and storage, approximate size 4×4 inches |
| Material | Nonstick coating on cooking surface, likely plastic or metal body |
| Versatile Use | Functions as burger grill, panini press, and breakfast maker |
Right out of the box, the Dash Mini Maker Grill feels like a friendly, approachable kitchen gadget. Its compact size is immediately noticeable, weighing just enough to feel sturdy without being bulky.
The 4-inch nonstick surface has a smooth, shiny finish that instantly suggests easy cleanup.
As I set it up, I appreciated how simple it was—just plug in, turn on, and you’re good to go. The surface heats evenly, which is crucial for a good burger, and I could see the heat indicator light reassuring me it was ready quickly.
The small size means it heats up fast, so you won’t be waiting long to get started.
Using it to grill burgers, I was surprised by how well it maintained consistent heat across the surface. The nonstick coating made flipping and cleaning a breeze, with no sticking or residue left behind.
It’s perfect for making quick, delicious burgers without firing up a full-sized grill.
Beyond burgers, I found myself experimenting with paninis and breakfast sandwiches. The versatility is a real plus—this compact device handles multiple meals seamlessly.
Plus, it’s lightweight enough to move around easily, so I could use it anywhere in the kitchen or even in a small dorm room.
Cleanup was straightforward—just wipe with a damp cloth or sponge. The even heating and nonstick surface definitely help save time and frustration.
Overall, it’s a handy little gadget that makes indoor grilling simple and mess-free, ideal for quick meals and small spaces.
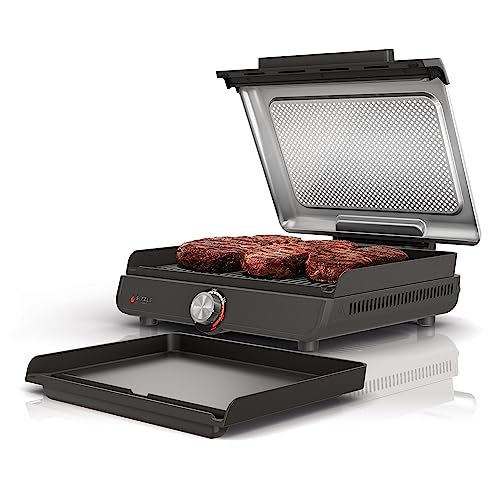
Ninja 14″ Electric Griddle & Indoor Grill, Nonstick, Silver
- ✓ Even heat distribution
- ✓ Easy to clean
- ✓ Versatile plates
- ✕ Slightly bulky for small kitchens
- ✕ Lid can be heavy to lift
| Max Temperature | 500°F (260°C) |
| Cooking Surface Diameter | 14 inches |
| Plate Material | Nonstick coated metal |
| Heating Technology | Edge-to-edge electric heating element |
| Cooking Capacity | Feeds 4-6 people with multiple burgers or pancakes |
| Additional Features | Interchangeable grill and griddle plates, dishwasher-safe removable plates |
The moment I unboxed the Ninja 14″ Electric Griddle & Indoor Grill, I was struck by how sleek and sturdy it feels. The silver finish is shiny without being flashy, and the weight is just right—not too bulky, yet solid enough to feel premium.
The nonstick plates are smooth to the touch, and the entire setup has a nice heft that suggests durability.
Firing it up for the first time, I appreciated how quickly it heats—reaching up to 500°F in minutes. The edge-to-edge heating is a game-changer, ensuring every burger gets an even sear without hot spots.
The interchangeable grill and griddle plates are easy to swap, and the high walls on the plates help contain grease and splatter, making cleanup less of a chore.
The perforated mesh lid is surprisingly effective at controlling smoke, which is a big plus if you’re cooking indoors. I threw on a batch of burgers and was impressed with the grill marks—deep, charred, and restaurant-quality.
The lid down option is perfect for melting cheese or keeping heat in, making it versatile for different cooking styles.
It easily fits six burgers or a stack of pancakes, so it’s great for family meals. Cleanup is straightforward since the nonstick plates are dishwasher safe, and the grease catches do a good job of keeping things tidy.
Whether I wanted grill marks or a flat griddle for breakfast, switching plates was a breeze.
Overall, this Ninja model handles high heat beautifully and offers consistent results. It’s a versatile, reliable tool that makes indoor grilling feel just as satisfying as outdoor cooking, especially for juicy burgers with those perfect sear lines.
Blackstone 5553 Cast Iron Griddle Press 10″x5.5

- ✓ Durable cast iron build
- ✓ Even heat distribution
- ✓ Easy to clean
- ✕ Slightly heavy to handle
- ✕ Limited to medium size
| Material | High-quality, heavy-gauge cast iron |
| Dimensions | 10 inches x 5.5 inches (25.4 cm x 14 cm) |
| Weight | 4.68 pounds (2.13 kg) |
| Handle Type | Heat-insulated rubber handles |
| Heat Resistance | Rust and heat-resistant due to cast iron construction |
| Cooking Surface | Smooth bottom for even heat distribution |
As soon as I took the Blackstone 5553 Cast Iron Griddle Press out of the box, I could feel its sturdy weight in my hand—about 4.68 pounds of solid cast iron. Its smooth, matte black finish looks sleek and feels durable, promising years of use.
The thick handle with heat-insulated rubber grips immediately caught my attention; it’s comfortable and secure, even when hot.
I started by pressing down on a thick, juicy burger patty. The heavy cast iron instantly heated up, and I noticed how evenly it distributed the heat—no hot spots here.
The flat bottom made contact perfectly, flattening the meat to an ideal thickness without any fuss. The ridges and the weight worked together to grease out excess oil while searing in flavor.
Cleaning was a breeze. A quick wipe with a damp cloth, and it looked almost new—no stubborn residue or sticking.
Its versatile design means I also used it on my stovetop skillet, and it performed just as well. The smooth bottom helps cook evenly, making it great for burgers, sausages, or even fish.
Plus, the compact size fits nicely on my grill or stovetop without taking up too much space.
Overall, this press feels like a quality investment. It’s built to last, handles heat well, and makes burger grilling much easier.
The rubber handle stays cool enough to hold comfortably, which is a big plus when grilling at high temperatures. Whether you’re making a quick weeknight dinner or impressing guests, this tool has definitely become a go-to in my grilling arsenal.
What is the Best Temperature to Grill a Burger?
Statistics show that over 70% of Americans grill burgers during the summer months, making it one of the most popular grilling foods. Understanding the best heat to grill burgers not only improves the dining experience but also encourages safer cooking practices, leading to healthier eating habits. Proper temperature management is essential for both casual grillers and culinary enthusiasts alike.
Best practices for grilling burgers include preheating the grill to the desired temperature before placing the patties on it, using an instant-read thermometer to check the internal temperature, and avoiding pressing down on the burgers while cooking to retain juices. Additionally, allowing the patties to rest for a few minutes after grilling can enhance flavor and moisture retention.
How Does Cooking Heat Influence Burger Quality?
The cooking heat significantly influences the quality of a burger, affecting its texture, juiciness, and flavor.
- High Heat: Cooking burgers at high heat creates a quick sear on the outside, which locks in moisture and enhances the flavor through the Maillard reaction.
- Medium Heat: Utilizing medium heat allows for a more controlled cooking process, ensuring the inside reaches the desired doneness without overcooking the exterior.
- Low Heat: Low heat is generally not recommended for burgers as it can lead to prolonged cooking times, resulting in a dry and less flavorful patty.
- Direct vs. Indirect Heat: Direct heat is ideal for searing burgers, while indirect heat can be used for finishing them off to the desired internal temperature without charring the outside.
- Resting Temperature: After cooking, allowing burgers to rest at room temperature helps redistribute juices, resulting in a juicier and more flavorful burger.
High heat is ideal for burgers as it forms a delicious crust while maintaining moisture inside. The Maillard reaction that occurs at high temperatures adds depth to the flavor, making it a preferred method for grilling.
Medium heat is a balanced approach that allows burgers to cook evenly, preventing the outside from burning while ensuring the inside reaches the appropriate temperature. This method is particularly useful for thicker patties, where even cooking is essential.
Low heat often leads to dry burgers as they cook too slowly, allowing moisture to escape. This method may also not achieve the desirable texture and flavor that searing provides.
Direct heat is perfect for the initial sear, creating a flavorful crust, while indirect heat can be used afterward to cook the burger to the desired doneness without risking a burnt exterior. This two-zone cooking technique is effective for achieving the perfect burger.
Resting the burger after cooking allows the juices, which have been pushed to the center during cooking, to redistribute throughout the patty. This step is crucial for maximizing flavor and moisture, resulting in a more satisfying eating experience.
What Are the Effects of Low Heat on Burger Texture and Flavor?
- Texture Softness: Cooking burgers at low heat tends to result in a softer, more tender texture. The slower cooking process allows the fat within the meat to render gradually, keeping the burger moist and avoiding a tough exterior.
- Flavor Development: Low heat reduces the Maillard reaction, which is responsible for the desirable browning and flavor complexity in grilled meats. As a result, burgers cooked at lower temperatures may lack the deep, rich flavors that come from higher heat searing.
- Juiciness Retention: Cooking at low temperatures helps in retaining juices within the burger, preventing moisture loss. This leads to a juicier bite, which can enhance the eating experience, though it may sometimes come at the cost of flavor depth.
- Cooking Time: Low heat requires a longer cooking time, which can be both a benefit and a drawback. While it allows for more even cooking throughout the patty, it can also lead to overcooking if not monitored closely, especially if the patties are thick.
- Risk of Undercooking: With low heat, there is a greater risk of undercooking the burger, particularly if the internal temperature does not reach safe levels. This raises food safety concerns, especially with ground beef, which should be cooked to an internal temperature of at least 160°F.
Why is Medium Heat Considered Ideal for Grilling Burgers?
Medium heat is considered ideal for grilling burgers because it allows for even cooking throughout the patty while achieving a desirable sear on the outside.
According to the USDA, ground beef should be cooked to an internal temperature of 160°F to ensure safety, which is best achieved at medium heat. This temperature range (around 350°F to 400°F) promotes the Maillard reaction, where sugars and amino acids react under heat to create a flavorful crust without burning the exterior before the interior is properly cooked.
The underlying mechanism involves heat transfer and cooking processes. At medium heat, the burgers can develop a nice brown crust due to the Maillard reaction while allowing the heat to penetrate evenly, cooking the meat thoroughly. If the heat is too high, the exterior can char, leading to a dry or burnt burger while the inside remains undercooked. Conversely, if the heat is too low, the burgers may not achieve a satisfying sear, resulting in a less flavorful product. Thus, medium heat strikes the right balance, ensuring both flavor and safety in cooking burgers.
What Advantages Does High Heat Provide for Cooking Burgers?
The advantages of using high heat for cooking burgers include enhanced flavor, improved texture, and faster cooking times.
- Enhanced Flavor: Cooking burgers at high heat allows for the Maillard reaction to occur, which is a chemical reaction between amino acids and reducing sugars that gives browned foods their distinctive flavor. This caramelization creates a delicious crust on the outside of the burger, intensifying the overall taste and making each bite more enjoyable.
- Improved Texture: High heat helps to sear the exterior of the burger quickly, locking in the juices and ensuring a moist interior while creating a crispy outside. This contrast in texture makes for a more satisfying eating experience, as the burger is both juicy and well-cooked on the outside.
- Faster Cooking Times: Cooking burgers at high heat significantly reduces the time they need to be on the grill, allowing for quicker meal preparation. This is particularly beneficial when grilling for a crowd, as it helps maintain the flow of cooking and keeps the burgers from drying out during prolonged exposure to heat.
- Better Fat Rendering: High heat helps render the fat in the ground beef more effectively, which can contribute to a richer flavor and juiciness in the finished burger. As the fat melts, it can baste the meat, preventing it from becoming dry and ensuring that each bite is flavorful.
- Visual Appeal: High heat grilling creates attractive grill marks and a visually appealing crust on the burgers, enhancing their presentation. This aesthetic quality can make the burgers more enticing to diners, which is especially important in a restaurant setting or at gatherings.
How Can You Achieve the Perfect Grilling Heat?
Achieving the perfect grilling heat is essential for cooking burgers that are both juicy and flavorful. Here are key strategies to help you reach the ideal temperature:
-
Know Your Grill: Gas and charcoal grills behave differently. Gas grills heat up quickly and allow for precise temperature control. Charcoal grills require careful management of the heat source but can produce a delightful smoky flavor.
-
Heat Levels: The sweet spot for grilling burgers is medium-high heat, around 375°F to 450°F. This temperature range ensures a caramelized exterior while keeping the inside juicy.
-
Preheat the Grill: Preheating is crucial. For gas grills, turn all burners on high for about 10-15 minutes. For charcoal grills, let the coals turn white, indicating they are ready for cooking.
-
Use the Right Tools: An instant-read thermometer can help verify the burger’s internal temperature. Aim for 160°F for ground beef to ensure it’s safe to eat.
-
Create Zones: On larger grills, consider setting up direct and indirect heat zones. This allows you to sear burgers over high heat and then move them to a cooler area to finish cooking without burning.
By following these steps, you can achieve the ideal grilling heat for succulent burgers.
What Tools Are Essential for Monitoring Burger Cooking Temperature?
To ensure burgers are cooked to perfection, several essential tools are necessary for monitoring cooking temperature.
- Instant-Read Thermometer: This tool provides quick and accurate temperature readings, allowing you to check the doneness of your burgers without losing heat. Simply insert the probe into the thickest part of the patty to ensure it has reached the safe minimum internal temperature of 160°F for ground beef.
- Infrared Thermometer: An infrared thermometer measures the surface temperature of the grill grates or the burger itself without direct contact. This is particularly useful for quickly assessing the heat of your grill and ensuring that it is at the optimal temperature for cooking burgers evenly.
- Meat Thermometer with Probe: A meat thermometer with a probe can be left in the burger while it cooks, providing continuous temperature readings. This allows for precise monitoring and can help prevent overcooking by alerting you when the target temperature is reached.
- Grill Heat Indicator: This tool can be a built-in feature of some grills or an external device that shows the temperature of the grill surface. Having a grill heat indicator helps you maintain consistent grilling temperatures, ensuring that your burgers are cooked evenly on both sides.
- Timer: While not a temperature monitoring tool per se, a timer is crucial for cooking burgers to the appropriate time based on thickness and desired doneness. Setting a timer helps you avoid overcooking and ensures your burgers are juicy and flavorful.
What Common Mistakes Should You Avoid When Grilling at Different Temperatures?
When grilling burgers, avoiding common mistakes related to temperature can significantly enhance your cooking results.
- Grilling at Too High a Temperature: Cooking burgers over excessively high heat can lead to burnt exteriors while leaving the inside undercooked. It often results in a dry texture because the moisture escapes too quickly, so it’s best to maintain a medium-high heat for even cooking.
- Not Preheating the Grill: Failing to preheat your grill can prevent you from achieving that perfect sear on your burger. A properly preheated grill creates a crust that locks in juices, enhancing flavor and texture; aim for around 400-450°F for optimal results.
- Using the Wrong Cooking Method: Some grillers may mistakenly apply direct heat for all types of burgers, but thicker patties benefit from a two-zone cooking method. This involves searing on high heat and then moving to a cooler side to finish cooking, ensuring they are cooked through without burning.
- Neglecting to Monitor Internal Temperature: Relying solely on cooking time rather than checking the internal temperature can lead to overcooked or undercooked burgers. Using a meat thermometer to ensure the internal temperature reaches at least 160°F will help achieve food safety and desired doneness.
- Flipping Too Frequently: Constantly flipping burgers can prevent proper browning and can lead to uneven cooking. Allowing the burgers to cook undisturbed for a few minutes on each side helps develop a nice crust, enhancing flavor and texture.