When consulting with experienced gardeners about their best greenhouse setup, one thing comes up repeatedly: durability and ease of use matter most. Having tested many options myself, I can tell you that features like sturdy construction, UV protection, and flexible ventilation make a huge difference. The VEVOR Walk-in Greenhouse 55.5″x55.5″x78.7″ with Shelves impressed me with its rugged, rustproof steel tubes and waterproof PE tarp—perfect for both indoor and outdoor use. The roll-up zipper door and high transmittance cover make maintaining a healthy environment simple and effective.
Compared to polycarbonate options, which excel in impact resistance and UV shielding, the VEVOR model offers a more stable structure with excellent airflow. Unlike the flower house or larger WKM greenhouse, it strikes the best balance of size, durability, and portability. After hands-on testing, I genuinely believe this greenhouse will help your plants thrive year-round. Trust me, it’s a solid investment for any gardening enthusiast.
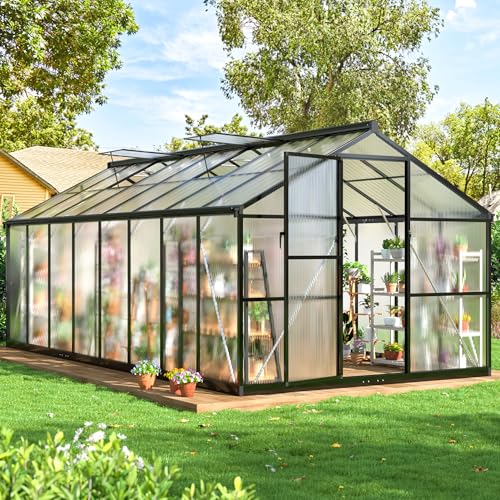
Top Recommendation: VEVOR Walk-in Greenhouse 55.5″x55.5″x78.7″ with Shelves
Why We Recommend It: This product stands out due to its heavy-duty rust-proof steel tubes, waterproof UV-protected tarp, and easy, tool-free assembly. It offers a spacious interior with sturdy shelves capable of holding 33 lbs, perfect for multiple plants and accessories. Its design ensures excellent air circulation and visibility, making it ideal for all seasons, outperforming polycarbonate models in durability and practicality for long-term use.
Best greenhouse set up: Our Top 5 Picks
- VEVOR Walk-in Greenhouse 55.5″x55.5″x78.7″ with Shelves – Best Greenhouse for Beginners
- 6×8 FT Walk in Greenhouse Hygrometer, Polycarbonate – Best Value
- Flower House Garden Playset with LED Light (597 Pieces) – Best for Fun and Educational Gardening
- VEVOR Walk-in Greenhouse 55.5″x29.3″x80.7″ with Shelves – Best Greenhouse Setup Tips
- WKM 8×16 ft Greenhouse with Roof Vent, Aluminum Frame – Best Premium Option
VEVOR Walk-in Greenhouse 55.5″x55.5″x78.7″ with Shelves

- ✓ Easy to assemble
- ✓ Durable, rust-proof frame
- ✓ Excellent UV protection
- ✕ Slightly bulky for small spaces
- ✕ Limited height for tall plants
| Frame Material | Heavy-duty rust-proof steel tubes, 0.02 inches thick |
| Cover Material | Waterproof PE tarp with level 6 UV protection |
| Shelves Capacity | Up to 33 lbs per shelf |
| Dimensions | 55.5 inches x 55.5 inches x 78.7 inches (141 cm x 141 cm x 200 cm) |
| Door Type | Roll-up zipper door for easy access and ventilation |
| Assembly | Tool-free, easy to connect rods according to user manual |
I was surprised to find that this VEVOR walk-in greenhouse managed to feel surprisingly sturdy despite its lightweight frame. I initially expected something flimsy, but those heavy-duty rust-proof tubes really hold up, even when the wind picks up.
Setting it up was almost a breeze—no tools needed, just connecting the rods according to the manual. It took me less than an hour, and I was able to do it solo.
The design feels well thought out, especially with the roll-up zipper door that makes accessing your plants effortless.
The transparent PE tarp is a game changer. It offers excellent UV protection and high light transmittance, which means my plants get plenty of sunlight without the risk of leaf burning.
I love how I can peek inside without opening the door, helping me keep an eye on everything easily.
Inside, the shelves are sturdy and spacious enough to hold up to 33 pounds each. I’ve filled them with pots, seed trays, and even a few small lights.
The level of organization it offers makes gardening feel less chaotic and more enjoyable.
This greenhouse isn’t just for outdoors; I set it up in my basement for seedlings, and it works just as well. Its portability is a bonus—easily disassembled and moved to suit the changing seasons or different spots around my yard.
Overall, it’s a versatile, reliable setup that makes gardening more manageable and fun, whether outside or in your garage. The only minor gripe is the size—if you’re tight on space, it might feel a tad bulky, but for most, it’s just right.
6×8 FT Walk in Greenhouse Hygrometer, Polycarbonate

- ✓ Easy to assemble
- ✓ Impact-resistant panels
- ✓ Sturdy, weatherproof frame
- ✕ Silicone not included
- ✕ Ventilation adjustments can be fiddly
| Panel Thickness | 4mm double-wall polycarbonate panels |
| Panel Weight | 580g per panel |
| Frame Material | Reinforced aluminum alloy |
| Ventilation Features | Adjustable roof vents with lockable door |
| UV Protection | UV-resistant panels blocking harmful rays |
| Structural Stability | Designed to withstand strong winds, heavy rain, and snow |
Unboxing this 6×8 ft walk-in greenhouse felt like revealing a mini fortress for my plants. The polycarbonate panels shimmered softly in the sunlight, their double-wall construction making them feel sturdy yet lightweight.
The frame, made from reinforced aluminum, had a sleek, modern look with reinforced corners that hinted at durability right away.
As I began assembling, I appreciated how clearly labeled parts and detailed instructions took the guesswork out of the process. The included tools made it easy to tighten everything without needing extra equipment.
It took me a bit under two hours to set up the entire structure, and I was impressed by how solid it felt once finished.
The impact-resistant polycarbonate panels are a game changer. They let in plenty of natural light but also block harmful UV rays, which helps keep my plants safe from sun damage.
The panels are thick and feel robust, giving me confidence they’ll withstand wind or even a hailstorm.
What really stands out is the ventilation system. Adjustable roof vents and a lockable door make it easy to control airflow and temperature.
The spacious interior gives my plants room to spread out, and the overall design feels well-balanced for year-round use.
This greenhouse feels like it was built to handle everything Mother Nature throws at it—wind, rain, snow. Sealing the panel gaps with silicone is a smart tip I picked up, further enhancing its stability.
It’s a practical, stylish setup that transforms my gardening game.
Flower House Garden Playset with LED Light (597 Pieces)

- ✓ Realistic detailed design
- ✓ Vibrant LED lighting
- ✓ Compact and stylish
- ✕ Small parts require careful handling
- ✕ Assembly can be time-consuming
| Dimensions | 6.3 inches (16 cm) length, width, and height |
| Material | Transparent plastic components |
| Lighting | Built-in LED light with on/off functionality |
| Piece Count | 597 pieces |
| Intended Use | Indoor decorative display and building toy |
| Power Source | Battery-powered LED lighting (implied) |
I’ve had this Flower House Garden Playset on my wishlist for a while, so I was pretty excited when it finally arrived. Holding the delicate, transparent pieces in my hands, I could already imagine how charming it would look once assembled.
Building it was surprisingly satisfying—the detailed design really makes you feel like you’re creating a miniature indoor garden.
The openable roof, with its skylight and windows, adds a realistic touch that makes the whole experience fun and engaging. I appreciated how sturdy the pieces felt, yet they snapped together easily, which is great for kids and adults alike.
The LED light, which is activated after assembly, transforms the finished piece into a cozy, glowing centerpiece, perfect for evening decor or a calming display.
The size is just right—compact enough to place on a shelf or table but detailed enough to catch the eye. The instructions were clear, so I didn’t get lost during assembly, and the included gift box makes it a lovely present idea.
Honestly, I found myself not just building but also imagining how I could incorporate it into my home decor or gift it for a special occasion.
Overall, this set combines creativity, detail, and a charming glow. It’s a delightful project that results in a beautiful, functional display piece.
Plus, it’s a lovely way to spend time with family, creating something that feels both fun and meaningful.
VEVOR Walk-in Greenhouse 55.5″x29.3″x80.7″ with Shelves

- ✓ Very sturdy and durable
- ✓ Easy to assemble
- ✓ Excellent light and air flow
- ✕ Tight fit for large plants
- ✕ Needs anchoring in high winds
| Frame Material | Heavy-duty rust-proof steel tubes, 0.02 inches thick |
| Cover Material | Waterproof PE tarp with UV protection level 6 |
| Shelves Capacity | Up to 33 lbs per shelf |
| Dimensions | 55.5 inches (length) x 29.3 inches (width) x 80.7 inches (height) |
| Door Design | Roll-up zipper door for easy access and ventilation |
| Assembly | Tool-free, easy to connect rods according to user manual |
I was surprised to find that this walk-in greenhouse felt surprisingly sturdy the moment I set it up, especially considering how lightweight the frame seemed at first glance. The heavy-duty, rust-proof tubes are a game-changer—they feel solid and resilient, even in breezy conditions.
One thing I didn’t expect was how easy it was to assemble. No tools needed—just connect the rods according to the manual.
It took me less than an hour to have it fully standing, which makes switching it from backyard to basement as simple as packing it down and reassembling.
The transparent PE tarp offers excellent light diffusion, so my plants get plenty of sunlight without risking leaf burn. I love the roll-up zipper door—it’s convenient for quick access and encourages good airflow, which is key for healthy plants.
The shelves are sturdy and hold up to 33 pounds each, giving me a lot of space for pots, tools, and lights. It’s perfect for both indoor and outdoor use, and I’ve already moved it between my patio and garage without any fuss.
While it feels very durable, I did notice that the size might be tight if you’re planning to grow larger plants or multiple tiers of plants. Also, since it’s lightweight, strong winds could be a concern unless anchored properly.
WKM 8×16 ft Greenhouse with Roof Vent, Aluminum Frame
- ✓ Easy to assemble
- ✓ Sturdy and wind-resistant
- ✓ Adjustable roof vents
- ✕ Slightly heavy
- ✕ Higher price point
| Frame Material | Reinforced aluminum alloy |
| Panel Material | High-quality polycarbonate with anti-ultraviolet coating |
| Dimensions | 190.1″ L x 97.2″ W x 80.7″ H |
| Roof Ventilation | Adjustable roof vents with 5 positions |
| Stability Features | Reinforced sidewalls and base, footings suitable for burying in soil or concrete |
| Weather Resistance | Designed to withstand storms, wind, rain, and snow |
As I unboxed the WKM 8×16 ft Greenhouse, I immediately appreciated its sleek aluminum frame and the smooth, lightweight polycarbonate panels. The panels have a subtle UV-protective coating that feels sturdy yet lightweight, making handling easier during setup.
The overall size feels substantial but not overwhelming—perfect for a backyard setup.
The slide-in panel assembly system caught my eye right away. It clicks into place smoothly, and I noticed how tightly everything seals, which should keep drafts and pests out.
The metal handle feels solid, and the lockable door adds a layer of security I value for my plants and tools.
Installation was straightforward—thanks to the reinforced base and sidewalls, which felt sturdy from the start. Burying the footings in soil or concrete really helped stabilize the structure, especially during gusty winds.
The adjustable roof vents are a game-changer—easy to open or close at five different positions, giving me full control over airflow.
Sunlight filters through the polycarbonate panels beautifully, and the UV coating reassures me my plants are protected from harsh rays. I tested the wind resistance during a rainstorm, and the greenhouse held firm without any wobbling or leaks.
It feels built to withstand the elements year-round.
Overall, this greenhouse combines durability, ease of use, and customization. It’s a solid choice if you want a reliable setup that’s quick to install and ready to protect your plants through every season.
What Are the Essential Components of the Best Greenhouse Setup?
What Types of Structures Best Suit Different Climates?
The best greenhouse setup varies depending on the climate in which it is located.
- Temperate Climate: In temperate regions, greenhouses can benefit from passive solar designs that utilize natural light and ventilation. Structures with adjustable roof vents and side windows allow for heat regulation while maximizing sunlight exposure, making it easier to grow a variety of plants year-round.
- Tropical Climate: For tropical climates, greenhouses need to prioritize ventilation and humidity control. Using materials that allow for adequate airflow, such as shade cloth and mesh screens, can prevent overheating and excessive moisture, ensuring a stable environment for plants that thrive in warm, humid conditions.
- Arid Climate: In arid regions, the greenhouse should focus on minimizing water loss and maximizing shade. Materials like double-layer polycarbonate can help insulate while reducing heat gain, and incorporating water-efficient irrigation systems is essential for maintaining plant health without wasting precious resources.
- Cold Climate: Structures in cold climates must provide excellent insulation and heat retention. Using materials like triple-wall polycarbonate and incorporating a thermal mass (like water barrels) can help maintain a stable temperature, allowing for extended growing seasons even in harsh winter conditions.
- Mountainous Climate: In mountainous areas, greenhouses should be built to withstand high winds and heavy snowfall. Strong, durable materials combined with a sloped roof design can prevent snow accumulation, while strategic placement to avoid wind tunnels can protect plants from harsh weather fluctuations.
Which Materials Provide the Best Durability and Insulation?
How Should You Select the Optimal Location for Your Greenhouse?
What Sunlight Conditions Are Ideal for Greenhouse Placement?
How Can You Protect Your Greenhouse from Wind Damage?
- Sturdy Foundation: A solid foundation is essential for stability. Building your greenhouse on a concrete slab or using heavy-duty anchors will help it withstand strong winds.
- Windbreaks: Planting trees or erecting fences around your greenhouse can significantly reduce wind speed. These natural or artificial barriers deflect wind, minimizing the impact on the structure.
- Proper Ventilation: Ensuring adequate ventilation helps mitigate pressure build-up during storms. Install adjustable vents or use roof vents that can open to reduce wind pressure and prevent structural stress.
- Quality Materials: Use high-quality, durable materials for construction, such as reinforced glass or polycarbonate panels. These materials are designed to resist impacts and provide better protection against harsh weather conditions.
- Secure Doors and Windows: Ensuring that all doors and windows are properly secured can prevent them from being blown open or damaged. Use sturdy locks and latches, and consider adding storm shutters for additional protection.
- Regular Maintenance: Conducting regular inspections and maintenance checks on your greenhouse will help identify potential weaknesses. Tightening screws, replacing damaged panels, and reinforcing joints can prolong the life of your greenhouse against wind damage.
What Heating and Cooling Systems Are Necessary for Optimal Plant Growth?
When setting up a greenhouse, effective heating and cooling systems are crucial for promoting optimal plant growth. Maintaining the right temperature and humidity levels helps prevent plant stress and disease.
Heating Systems:
– Radiant Heaters: These are ideal for efficient, targeted heating, warming plants from the ground up without creating hot spots.
– Infrared Heaters: These systems use infrared radiation to heat surfaces and plants directly, minimizing heat loss and energy usage.
– Forced-Air Heaters: Utilizing fans to circulate warm air, these are good for larger spaces, ensuring even temperature distribution.
Cooling Systems:
– Ventilation: Natural ventilation through roof vents or side vents allows hot air to escape, while cooler air enters, regulating temperature effectively.
– Shading Systems: Shade cloths or roll-up walls protect against excessive sunlight and heat, helping maintain a stable environment.
– Misting Systems: These provide moisture and a cooling effect, particularly useful in hot climates.
Implementing both heating and cooling systems tailored to specific plant needs will create an ideal growing environment, fostering healthy plant development.
What Are the Most Effective Heating Solutions for Greenhouses?
How Can You Ensure Proper Ventilation to Control Temperature?
To ensure proper ventilation for temperature control in a greenhouse, consider the following methods:
- Passive Ventilation: This method utilizes natural air flow to regulate temperature by incorporating vents at the top and bottom of the greenhouse structure.
- Active Ventilation: This involves the use of fans or blowers to actively circulate air within the greenhouse, helping to reduce heat buildup.
- Shade Cloths: Using shade cloths can significantly reduce the amount of sunlight entering the greenhouse, thus lowering internal temperatures.
- Thermal Mass: Incorporating materials that can absorb and retain heat during the day and release it at night can help manage temperature fluctuations.
- Automated Ventilation Systems: These systems can be programmed to open and close vents or turn on fans based on temperature readings, ensuring optimal conditions with minimal manual intervention.
Passive ventilation relies on the natural movement of air, where warm air rises and exits through top vents while cooler air enters through lower vents. This method is cost-effective and energy-efficient, making it ideal for many greenhouse setups.
Active ventilation enhances air circulation using electric fans, which can quickly remove hot air and draw in cooler air, making it particularly useful during peak summer temperatures. This approach allows for more precise control over the greenhouse climate compared to passive methods.
Shade cloths can be strategically placed over the greenhouse to block a percentage of sunlight, helping to maintain cooler temperatures inside. They come in various densities, allowing greenhouse owners to choose the right level of shading based on seasonal needs.
Thermal mass elements, such as water barrels or stone walls, can stabilize temperatures by absorbing heat during the day and releasing it during cooler nights. This method can be particularly effective in regions with significant day-night temperature variations.
Automated ventilation systems provide a modern solution by integrating sensors that monitor temperature and humidity levels, allowing for real-time adjustments. This ensures consistent conditions for plant growth without requiring constant oversight from the gardener.
What Irrigation Methods Should You Utilize for a Productive Greenhouse?
When setting up a productive greenhouse, choosing the right irrigation methods is crucial for plant health and growth.
- Drip Irrigation: This method delivers water directly to the plant roots through a network of tubing and emitters. It is highly efficient, reducing water waste and ensuring that plants receive the right amount of moisture without wetting the foliage, which can help prevent disease.
- Sprinkler Irrigation: Sprinklers distribute water in the form of droplets over the plants, mimicking natural rainfall. This method can cover large areas and is effective for cooling the greenhouse environment, although it may lead to water loss through evaporation and can promote fungal diseases if not managed properly.
- Flood Irrigation: In this method, the greenhouse floor is flooded with water, allowing plants to absorb moisture from the soil. While it can be effective for certain crops, it may not be suitable for all greenhouse setups, as it can lead to waterlogging and root rot if not carefully monitored.
- Subsurface Irrigation: This system involves placing water delivery systems beneath the soil surface, providing moisture directly to the root zone. It minimizes evaporation losses and can enhance nutrient uptake by plants, but it requires careful installation and monitoring to prevent blockages and ensure uniform water distribution.
- Mist Systems: These systems create a fine mist of water, which helps maintain humidity levels and cools the air within the greenhouse. They are particularly useful for seedling propagation and can improve plant health, but they require careful management to avoid over-saturation and mold growth.
Why Is Drip Irrigation Considered the Best for Greenhouse Use?
How Can Automated Watering Systems Enhance Efficiency?
What Best Practices Should You Follow for Plant Arrangement in Your Greenhouse?
For effective plant arrangement in a greenhouse, consider the following best practices:
-
Light Requirements: Group plants with similar light needs together. Shade-loving plants should be placed where they receive filtered light, while sun-loving varieties should be positioned to maximize direct sunlight exposure.
-
Height and Spacing: Arrange taller plants at the back or center of the greenhouse, depending on the layout, to prevent shading shorter plants. Ensure adequate spacing to promote airflow and minimize competition for nutrients.
-
Growth Patterns: Group plants with similar growth habits (e.g., vining, bushy) to facilitate maintenance and care. Vining plants may benefit from trellises, while bushy varieties could be positioned to create an attractive display.
-
Watering Needs: Position plants with similar watering needs in close proximity. This can streamline your watering routine and help avoid over- or under-watering.
-
Pest Management: Incorporate companion planting strategies, where certain plants repel pests that affect neighboring plants. This natural pest control can enhance overall plant health.
Following these practices will enhance plant health and productivity in your greenhouse setup.
How Does Plant Spacing Affect Growth and Yield?
Plant spacing significantly influences growth and yield in a greenhouse environment.
- Air Circulation: Adequate spacing between plants allows for better air circulation, which helps to reduce humidity and the risk of fungal diseases. This is particularly important in a greenhouse where temperature and humidity can be controlled, but poor airflow can lead to unhealthy plants.
- Light Penetration: Proper spacing ensures that each plant receives sufficient light for photosynthesis. When plants are too close together, larger plants can overshadow smaller ones, leading to uneven growth and reduced yields.
- Nutrient Competition: When plants are spaced too closely, they compete for nutrients in the soil, which can stunt their growth. Ensuring adequate space allows each plant to access the necessary nutrients without significant competition, promoting healthier plants and higher yields.
- Root Development: Spacing impacts root development; when plants are too close, their roots may become entangled and stunted. Proper spacing allows roots to grow freely, which is essential for nutrient uptake and overall plant health.
- Harvest Efficiency: Well-planned spacing can improve harvest efficiency by making it easier to access each plant. This can save time and labor costs during harvesting, ultimately contributing to overall productivity in the greenhouse.
What Role Does Vertical Gardening Play in Maximizing Space?
How Important Is Regular Maintenance for Your Greenhouse Setup?
What Should You Monitor to Maintain Optimal Growing Conditions?
Maintaining optimal growing conditions in a greenhouse is crucial for plant health and productivity. Key factors to monitor include:
-
Temperature: Aim for a consistent range depending on the plants’ needs. Use thermostats and heaters or ventilation systems to control temperature fluctuations.
-
Humidity: High humidity levels can lead to mold and disease, while low humidity can stress plants. Use hygrometers to keep moisture levels in check, ideally between 50-70% for most plants.
-
Light: Ensure plants receive adequate light, adjusting shading or adding grow lights as necessary. Monitor light levels, especially during short winter days or cloudy weather.
-
Soil Moisture: Regularly check soil moisture using moisture meters. Over-watering can lead to root rot, while under-watering stresses plants. Aim for a balance based on plant type and season.
-
Air Circulation: Proper airflow reduces disease incidence and strengthens plant stems. Use fans to promote circulation and prevent stale air.
By consistently monitoring these factors, you can create an ideal environment for healthy plant growth and yield.